Ecommerce is booming with each passing day. Global ecommerce sales are expected to exceed $6 billion in 2024 and reach $8 billion in 2025, according to Statista. That shows how this kind of business is not stopping anytime and will only continue to balloon.
However, starting and succeeding in ecommerce can be challenging. It requires meticulous planning coupled with the right tools. For instance, you must use the right automation platform to manage the ecommerce business.
EcommerceBot is one of the top AI-powered ecommerce automation solutions for sellers to manage their ecommerce business. The platform aims to help streamline every activity in your online store.
Whether you need to track orders and inventory, create and place ads, or engage customers and provide customer support, EcommerceBot is the best solution.
But how does the platform work? How does it help grow your ecommerce business?
Today, we will examine how Ecommerce Bot works and how to leverage its features to achieve your e-commerce goals.
Let’s dive right in;
Table of Contents
Feature 1: Shopify Integration
Let’s explore how the Shopify integration feature works and how to install it in your Shopify store.
Well, the Shopify integration is an AI-powered feature that automates more than one function on your Shopify store. For starters, it allows you to automate the most crucial aspects of your online store, including order tracking, inventory tracking, and store analytics.
Automating order tracking provides the necessary information for an efficient live chat with customers. On the other hand, order and store analytics help create the best ads for your target audience.
Shopify integration also evaluates the store’s activities and performance to offer the best insights on optimizing your shop.
It analyzes every aspect of the store, including your social media presence, website setup, website traffic, and ads, to offer a comprehensive permanence score and optimization suggestions.
But to enjoy this feature, follow these steps:
Chatbot Installation on Your Shopify Store
You can install the chatbot on your Shopify store in 2 simple steps.
First, you need to log in to your app by visiting https://app.ecommercebot.com/.
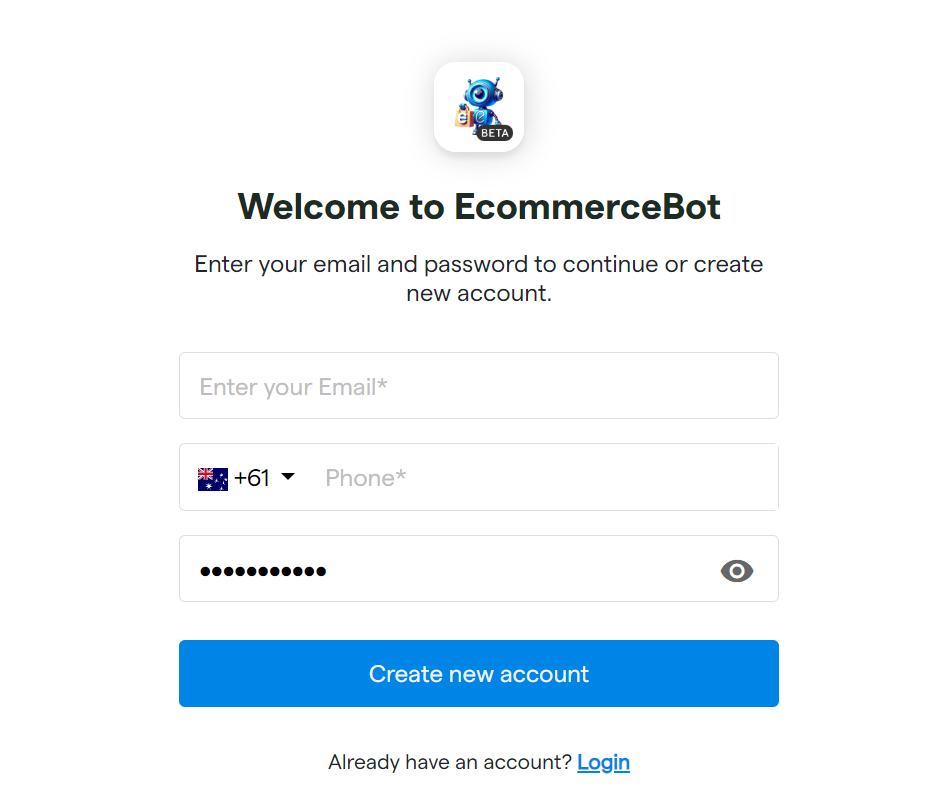
Once there, go to the “Website Bot” and then the “website chatbot settings” section. From there, install your bot to get the chatbot script code.
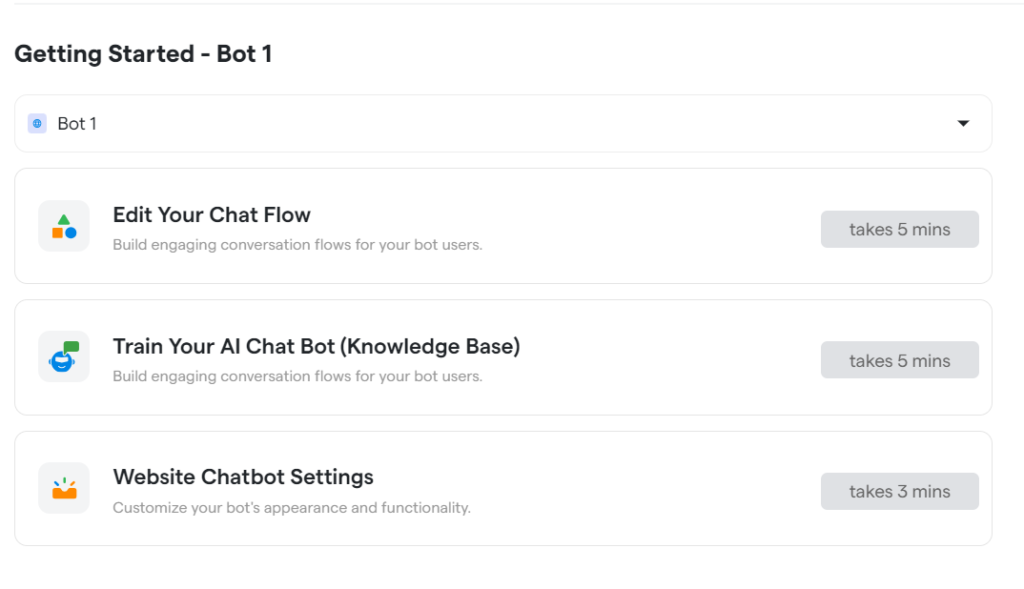
Copy this script code.
Now, to the second step. Go to your Shopify store and log in. Once you are in, complete these simple steps:
Browse to the online store and click Customize.
You’ll see three little dots in the top left corner, which you must click to choose “edit code.
- Then, you’ll need to find the header.
- Type the word header in the filter files box.
- Once you have your header, paste the script code you copied earlier in row 1 or the first section.
- To complete the process, click save.
The chatbot should be in your Shopify store by now. If not, refresh your store until you see it—it sometimes takes a few minutes.
Connect Your Shopify Store
After the installation is complete, it’s time to connect your Shopify store. The steps are as follows:
- Go back to your Ecommerce Bot and log in.
- You’ll see a “connect channel” option – click on it.
- From here, click “Shopify.”
- The last step is to click “Connect,” and your app is integrated into your Shopify store.
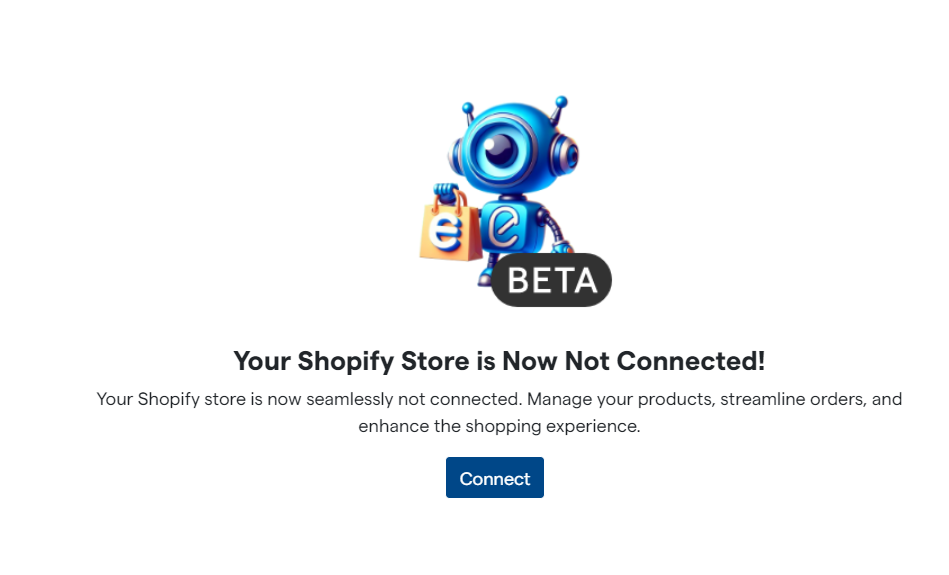
You are now ready to enjoy all the benefits of this feature, as listed earlier.
Shopify Overview
Once the integration is complete, you can use its features to grow your online store. For instance, when you click Shopify on your app, you can see an overview of your shop in four sections: Home, Orders, Inventory, and Installations.
- Under ‘Home,’ you can see all the information about your sales. This includes total sales, profits, average order value, and abandoned orders.
- Under the Shopify overview, you’ll see the top-performing products and how much revenue they have generated for your shop. It also shows the number of pieces sold for that product.
- Under the “Order” section, you can view a comprehensive overview of your orders. This includes details like order number, customer name, total order amount, payment status, items, fulfillment status, and delivery status.
All this information is crucial, especially for the chatbot. It helps you know what a customer bought and their order status, allowing you to give accurate answers to any query.
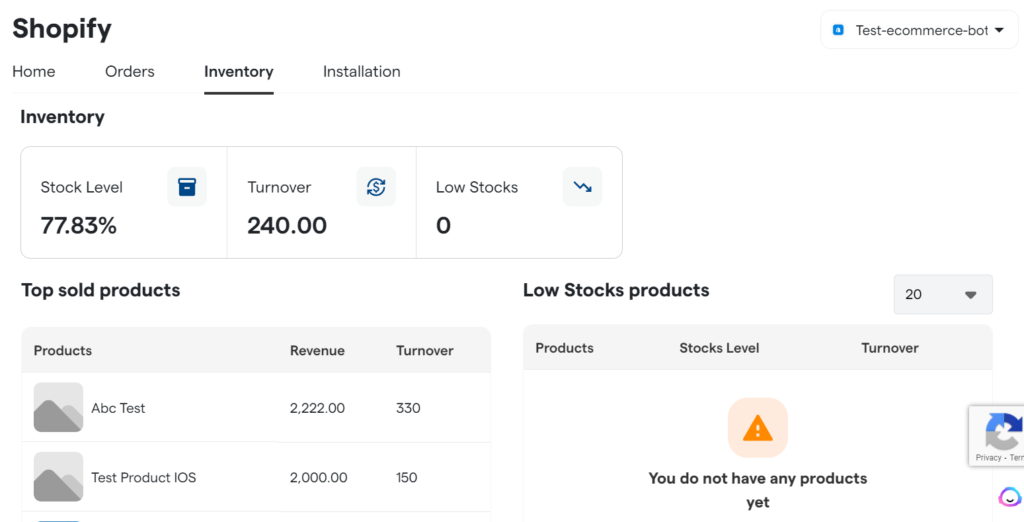
The “Inventory” section is essential. This section gives you access to your shop’s stock level, stock left, ideal stock level, and turnover.
You can also see the number of products present in low stock.
The ideal stock is the maximum inventory you wish to hold in your store.
On the other hand, your turnover refers to the number of days a particular product takes to run out of stock.
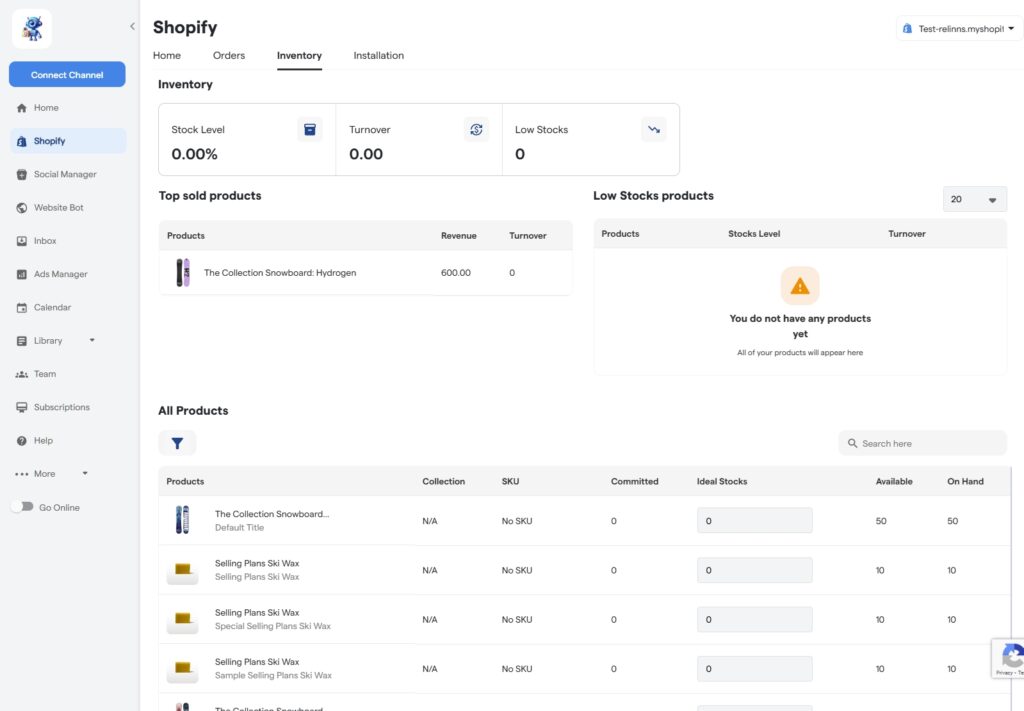
This data helps you maintain enough stock at all times.
However, for the system to work efficiently, you should include the ideal stock for every product.
Still, inside the inventory section, you will see another section about the top-sold products. It includes sub-sections on products, revenue, and turnover.
On the right side of the “top sold products” section is the “low stock products” section. This one includes the products, stock level, and revenue sub-sections.
Feature 2: The Social Media Manager
The second essential feature of EcommerceBot is the Social Media Manager. This feature lets you connect your online shop with your social media channels to manage your social media presence easily.
Once you click the Social Manager on your app, you’ll see all the social media channels supported by EcommerceBot. These include Facebook, Instagram, and TikTok.
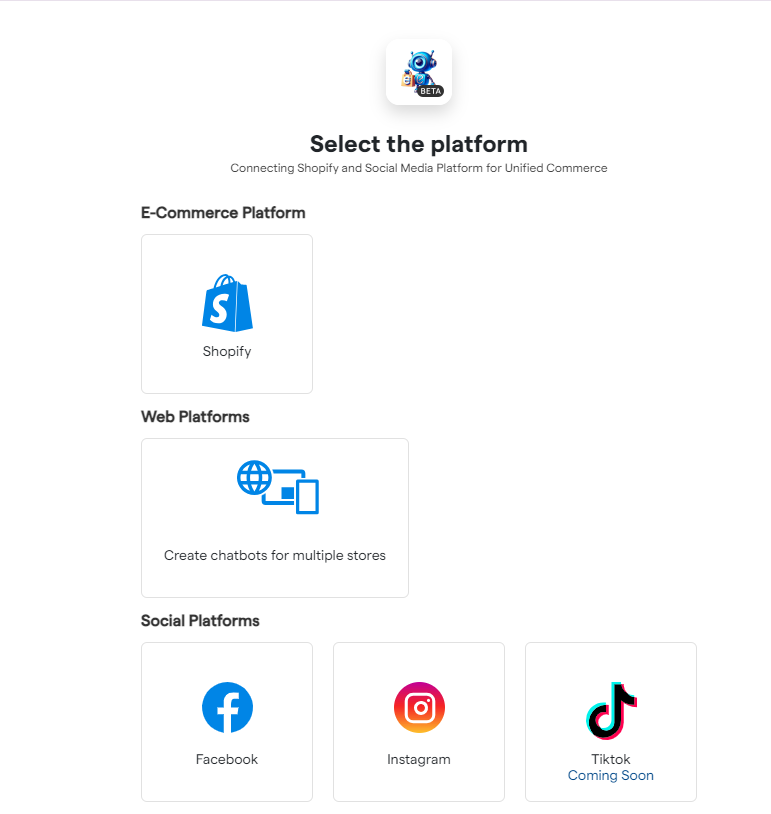
So, depending on which you want to link to your shop, you’ll need to click its icon and follow the prompts.
You can see various metrics for each social platform, including the number of followers, posts, daily impressions, and reach.
Such metrics help you gauge your social media activities and see where you should improve.
Under the Social Media Manager, there are three main sections: the dashboard, the posts, and the chatbot areas.
Let’s explore deeper to understand how each of these sub-features works.
Dashboard
Inside the dashboard, that’s where all the metrics for your social media channels are. For instance, if you are connected to Instagram, you can see metrics such as:
- The number of followers
- Following
- Total posts
- Reach
- Impressions
You can click the “deeper insights” button to see more metrics.
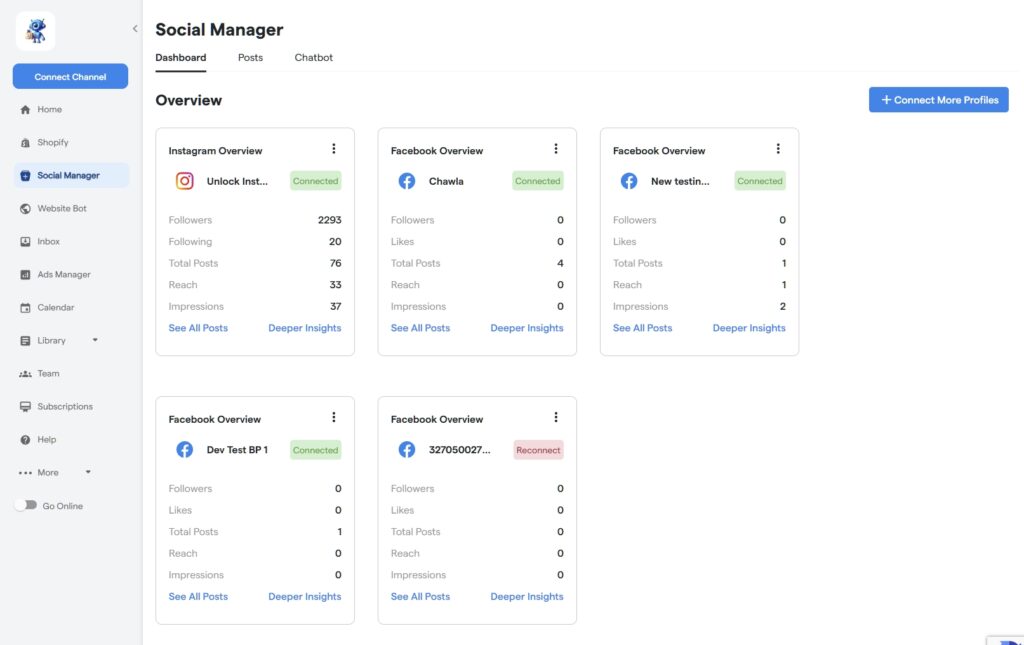
If you are connected on Facebook, the metrics here will include:
- Number of followers
- Likes
- Total posts
- Reach
- Impressions
For example, you can see more metrics on Instagram by clicking “deeper insights.” Metrics here would include things like:
- Clicked links
- Number of profile views
- Estimated demographics of the target
Note: You can connect profiles for your platforms as you wish.
Posts for Social Media
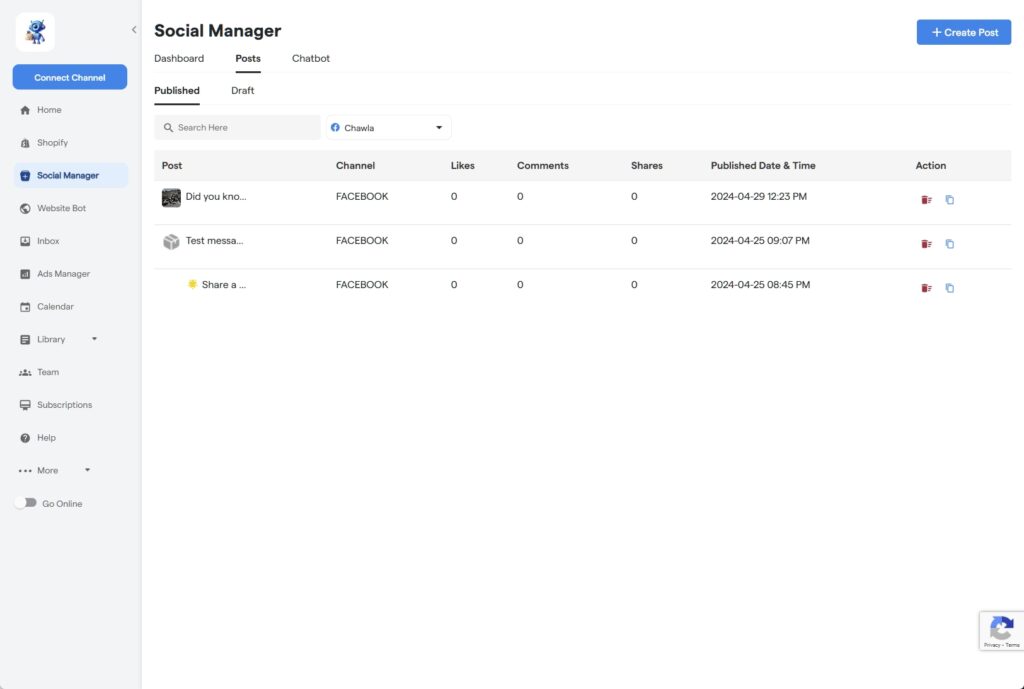
Here, you’ll get an overview of all your posts, including their metrics. This helps you see which posts are performing and which are not.
Also, if there is a post you’ve created but have yet to post, you can see it in the drafts.
The leading information available here includes:
- Posts
- Channels
- Likes
- Comments
- Shares
- Date and time of publication
- Action
It’s also from this section where you create your posts. And here is how the process goes!
First, click on the blue icon at the top-hand corner, “Create Post.”
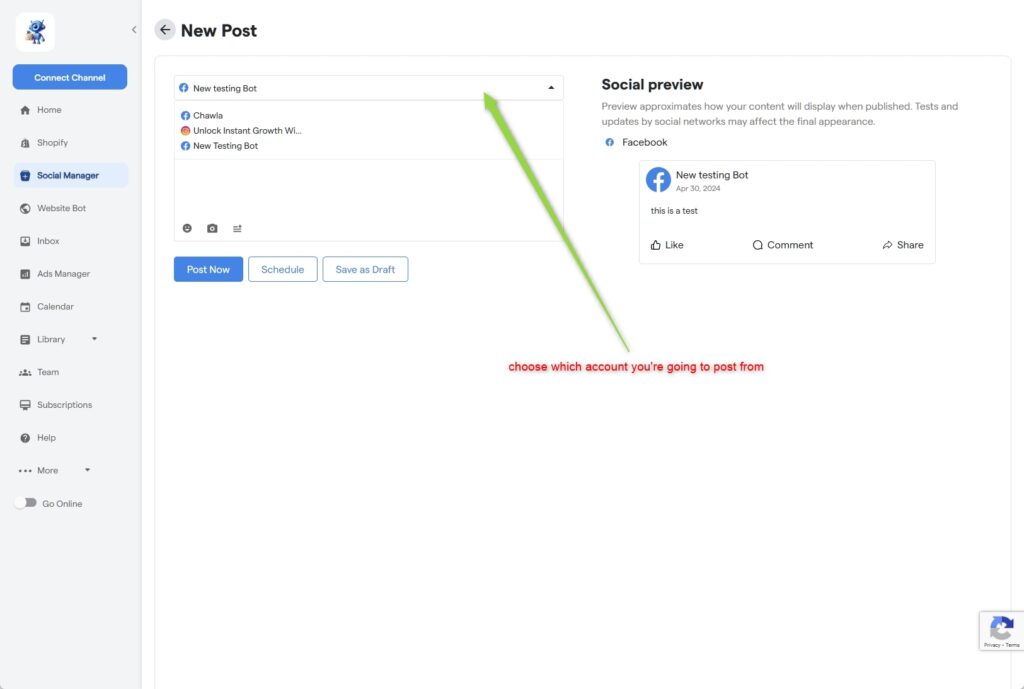
Then, click the first row to choose the platform you’ll be posting on.
After you pick your desired account, follow these steps:
Create your description
After choosing an account, you’ll be taken to a blank box where you can create your post. You can type your post’s description here or have the AI do it.
Press the three lines beside the camera inside the box to create an AI-generated description. This leads to a “prompt box” where you can type your prompt for the post description.
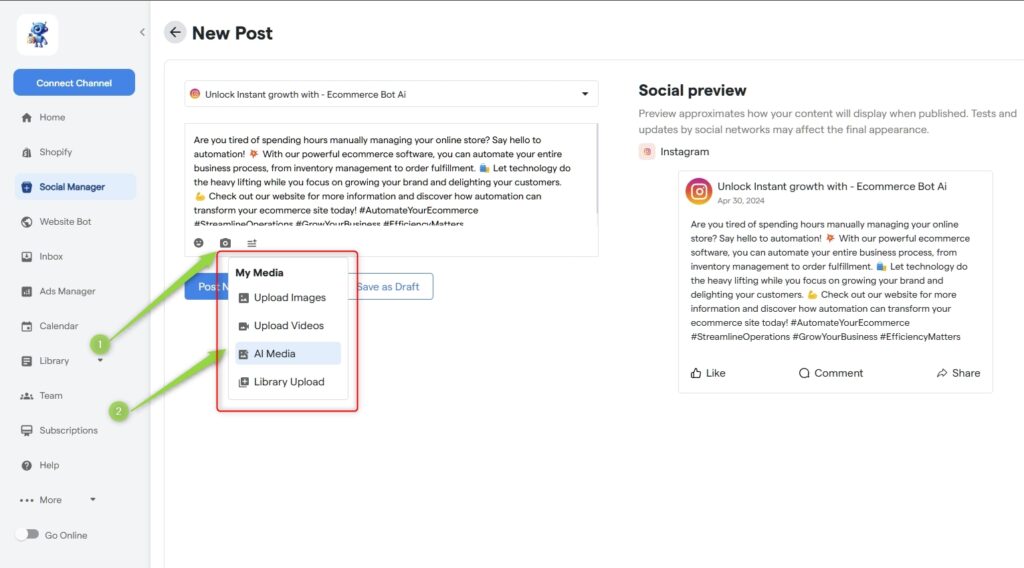
Once done, click the same three dots to generate your description. The same prompt is used to create AI-generated images and videos.
Note: The prompt for the description is trained based on your business data and the app’s knowledge base.
Create AI Images and Videos
Once you finish the description, you can create or upload the image or video you wish to post.
When uploading an image, the first step is to click on the camera icon.
- Inside, click “upload images” and then choose your image.
- If it’s a video, click “upload videos” and select your video.
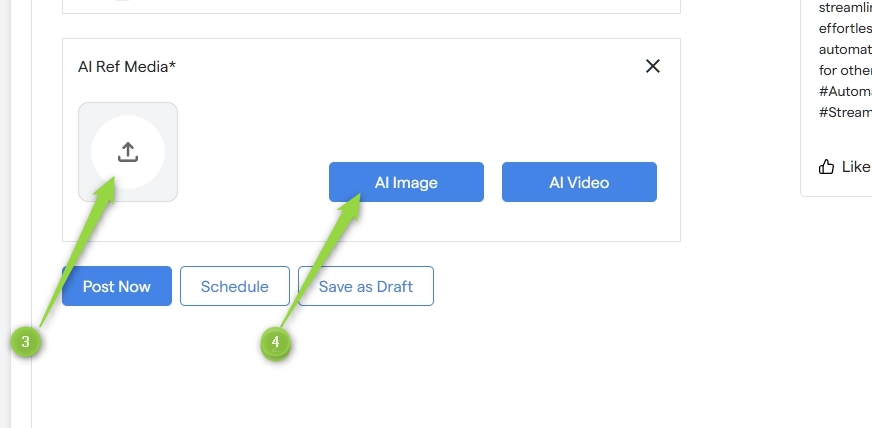
- Alternatively, you can create AI media (images or videos).
- To do so, click on the camera, then AI media. From here, click “Upload AI Ref Media.
” This is the image the AI uses to create the AI-generated image or video.
Post or Schedule the Post
Once you’ve created your post, you can post it immediately or schedule it later.
Alternatively, you can save it as a draft.
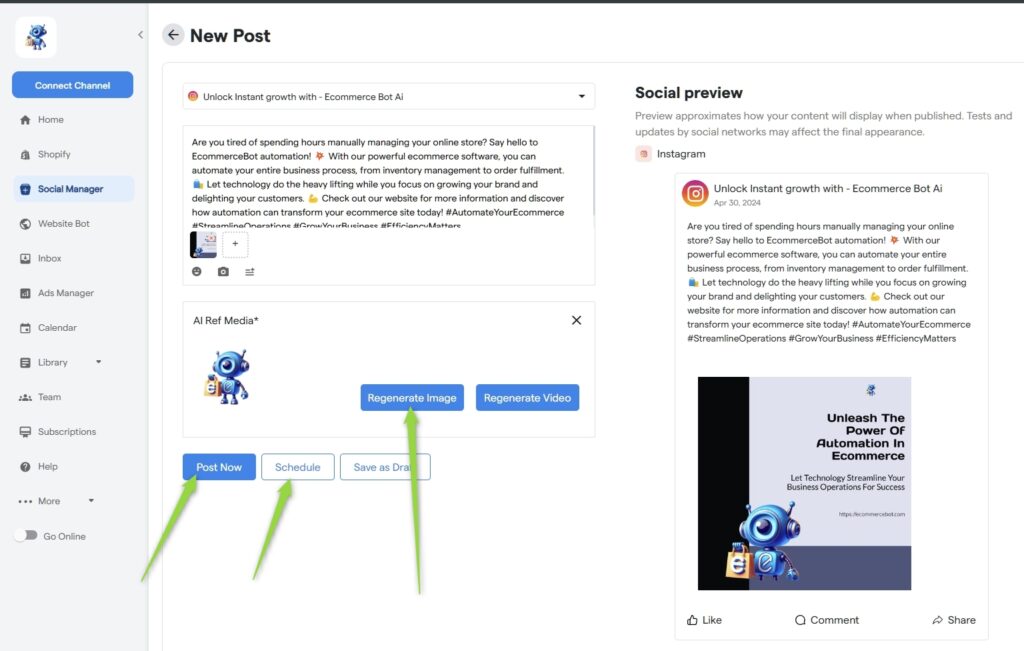
You’ll see all three options at the bottom of your post.
Scheduling allows consistent posting in the future. It ensures you remember and post what you want on a particular date.
Deeper Overview
Clicking “deeper insights” on social media channels takes you to the deeper overview section. Here, you can see more metrics on how your posts are doing.
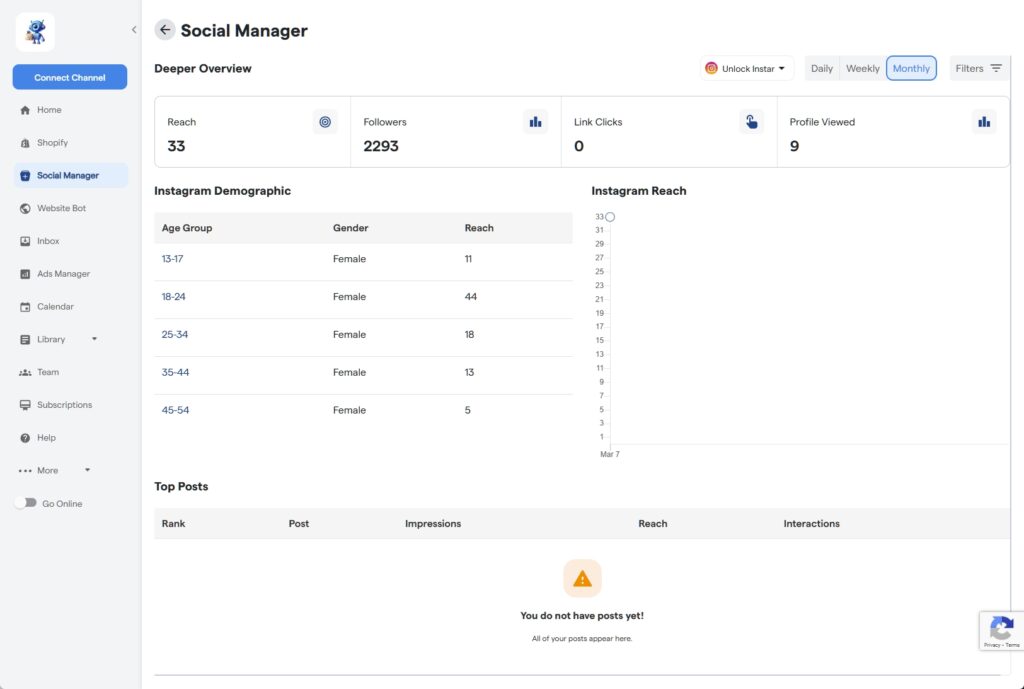
The section displays all your top posts with metrics such as:
- Reach
- Followers
- Link clicks
- Profile viewed
You’ll also see your target audience’s different demographics and how they engage with your posts.
For instance, the posts reach various age groups and genders.
All these metrics could be viewed monthly, weekly, or daily.
These posts are ranked based on performance, starting with the best-performing ones. This includes each post’s rank, reach, impressions, and interactions.
Chatbot
Another sub-feature within the Social Media Manager is the chatbot. EcommerceBot chatbot allows you to create and manage your chat flow for the live chat. This feature will be launched soon.
How to Connect Your Social Media Channel
Now that we’ve learned about the Social Media Manager and its different functionalities, it’s time to connect it. Here are six steps to follow when connecting your social platforms.
The first step is to visit EcommerceBot’s official website and log in.
Once in, look for “Connect Channel” and click.
This should take you to a dashboard displaying Shopify and all the social media platform icons.
From the list, click the icon of the social media channel you want to connect to, either Facebook, Instagram, or TikTok.
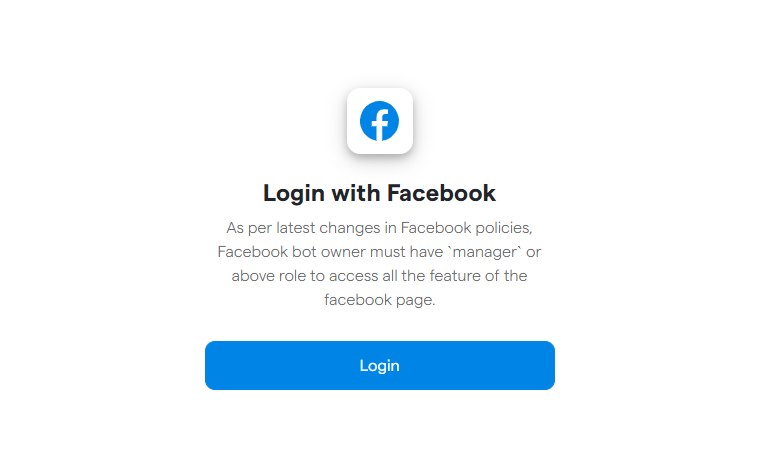
You will be led to the Facebook login page if you pick Facebook.
- Log in to continue.
- You’ll see two prompts to take action on the display page – “Reconnect” and “Not Now.” Choose “Reconnect.
- ” Another page opens with a blue button marked “Got it.”
- Go ahead and click it.
This takes you to the next step – completing your setup process.
Here, click on the blue “Connect” button. Your Facebook account is now connected and operational.
Feature 3: Website Bot
Besides the Shopify integration and Social media Manager, EcommerceBot has a Website Bot feature known as Omnichannel Chatbot. This feature presents the most effective way of engaging with your customers.
For example, it offers personalized responses to all customer queries, which boosts your shop’s user engagement, by leveraging the power of AI, the omnichannel offers 24/7 live chat customer support.
This ensures that all customer concerns, queries, or problems are handled on time across all your social media channels.
However, to enjoy the benefits of this feature, you must complete the following steps.
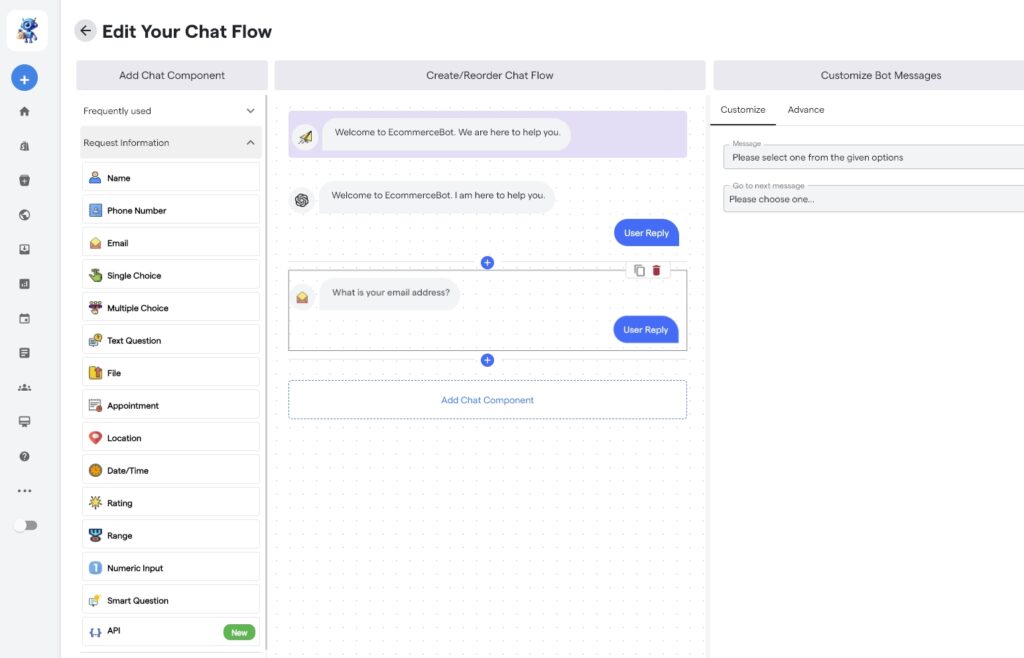
Setting Up and Editing a Chat Flow
Creating a chat flow determines the route your customers follow when contacting you. And the first thing here is to create a welcome message. This could be any welcoming message like:
- Welcome to XXX company. We are delighted to help.
- Welcome to XXX. How can we help you today?
The message should make the user feel valued and see your willingness to help sort out their issue or answer their queries.
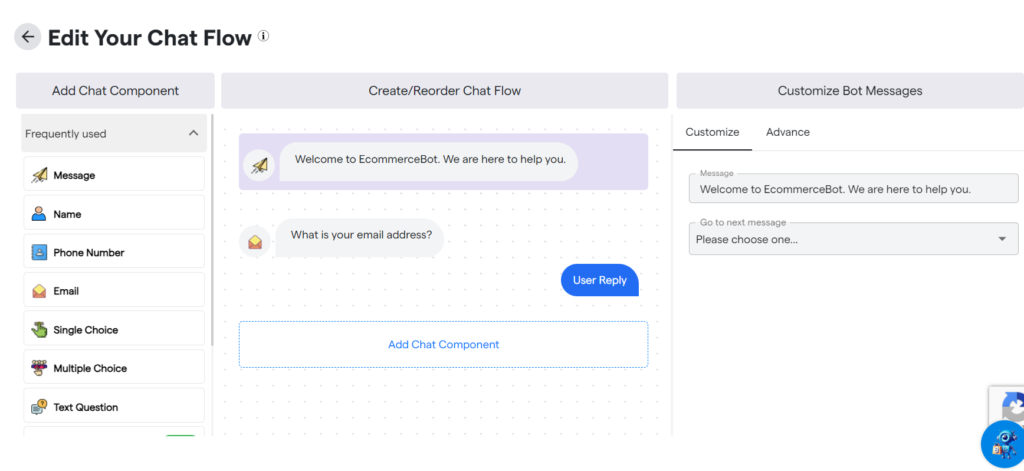
From here, you should determine how the chat flows. Usually, you have two choices.
First, you can decide to go with just a message.
This option involves using a message without any follow-ups.
For example, after the welcome message, the chatbot answers the user’s queries without asking questions to capture leads.
Alternatively, you can go with the name option.
Here, you want to capture a lead.
So, the chatbot can ask the user for details like their name, email, or phone number, which helps capture the lead.
Choose Between Single or Multiple Choice Options
You use a single-choice or multiple-choice route when creating your chat flow. The user can only pick one choice or query in a single choice.
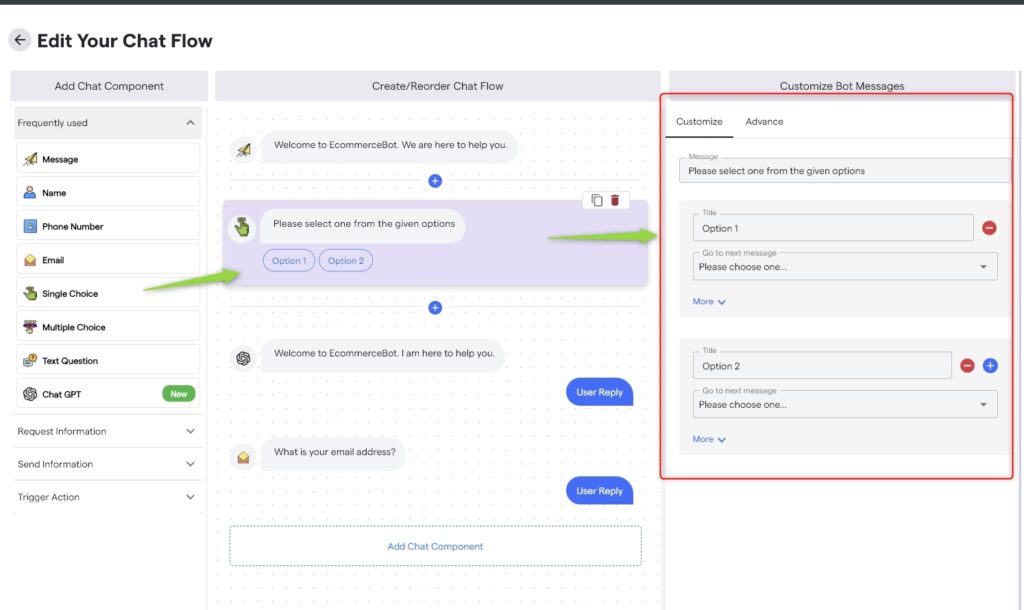
For instance, they could pick one of the following choices from the list:
- What’s my order status?
- Track my order
- Talk or chat with a live agent
- Recommend products
You can include as many choices as possible to try and exhaust the users’ queries.
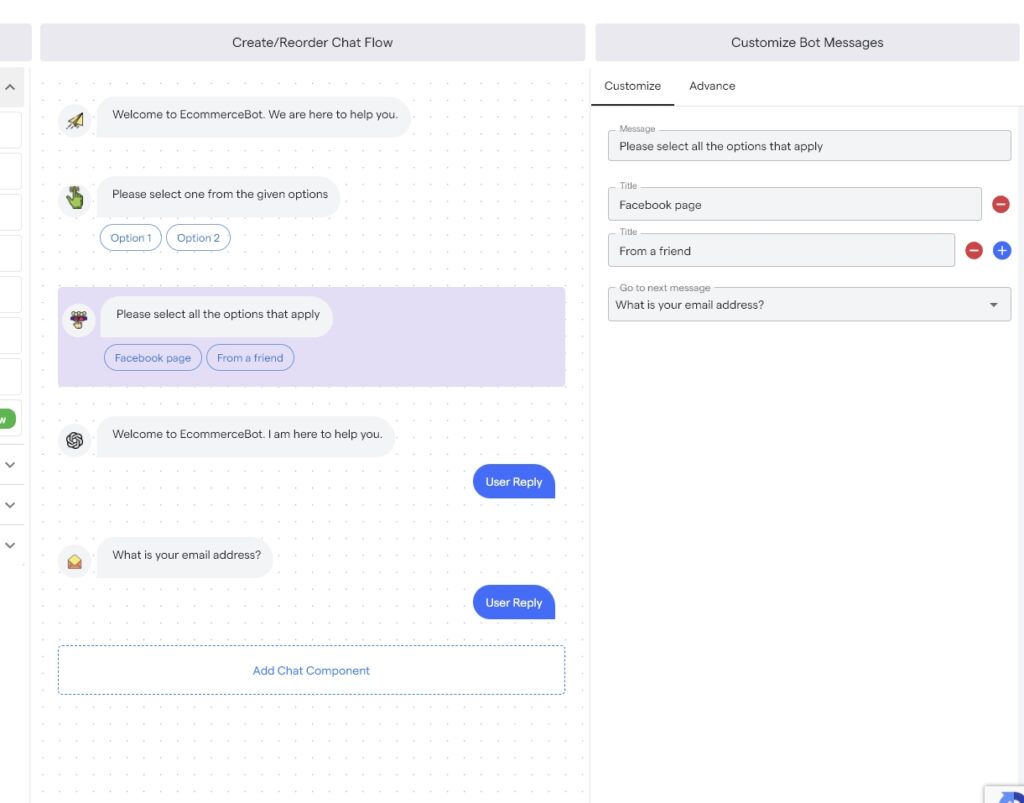
Alternatively, you can choose to use the multiple-choice option. Here, a user can select several requests or queries at once.
Text Questions
The “Text Questions” feature allows you to formulate premade questions quickly.
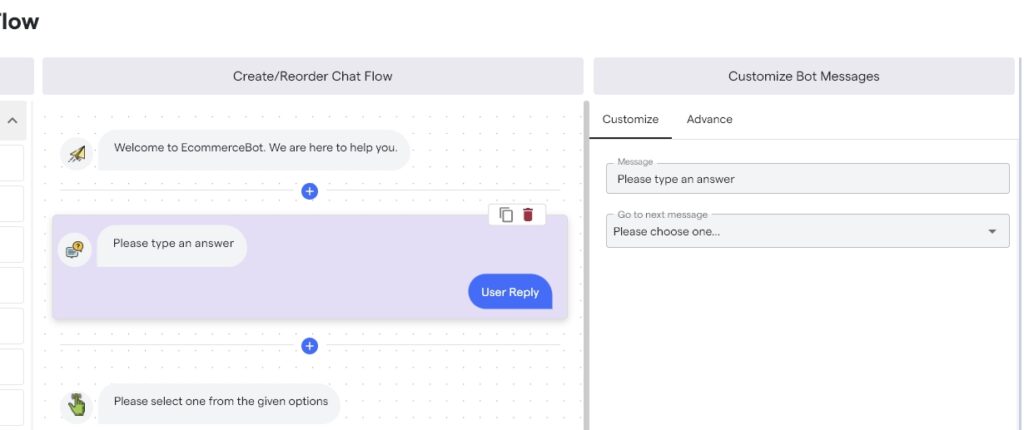
Once a user clicks on any question, they get instant answers from ChatGPT.
Training your AI ChatBot
For the chatbot to offer accurate and helpful answers to the users, it needs some training to grow its knowledge base. The main steps in training your chatbot’s knowledge base involve the following:
Training on the URLs
Start by training your chatbot on your website’s URLs. This is pretty simple.
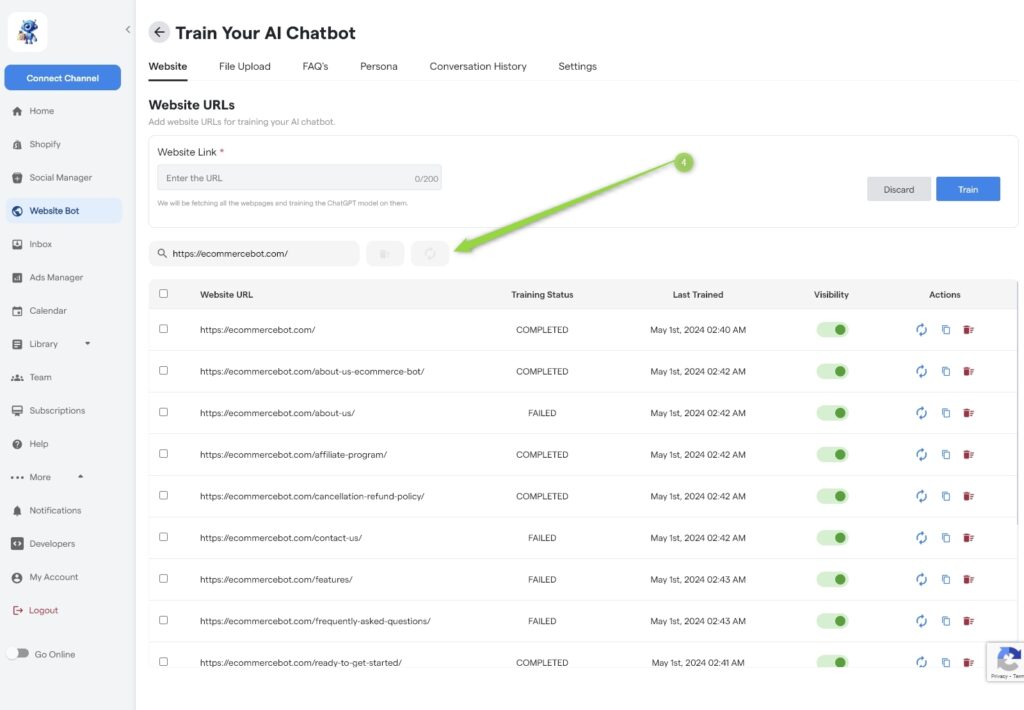
All you need to do is click on the “Website Bot” and choose “Train Your AI Chatbot.” Here, you’ll see several headers, with the first being “Website.” Hit that!
You will see the “Add Website” section on the right-hand side. Clicking this should open a new box named “Website Link.
” Enter your website link here and click the blue “Train” button. Then, wait for the training process to complete.
The process will train your AI chatbot on all your website’s URLs. This means it can now answer any question concerning any URLs.
File Uploads
The next step is to upload your files. This includes all your company files, campaign files, company rules, and anything related to your company and its products. It should also include everything that might help in training your customer assistant.
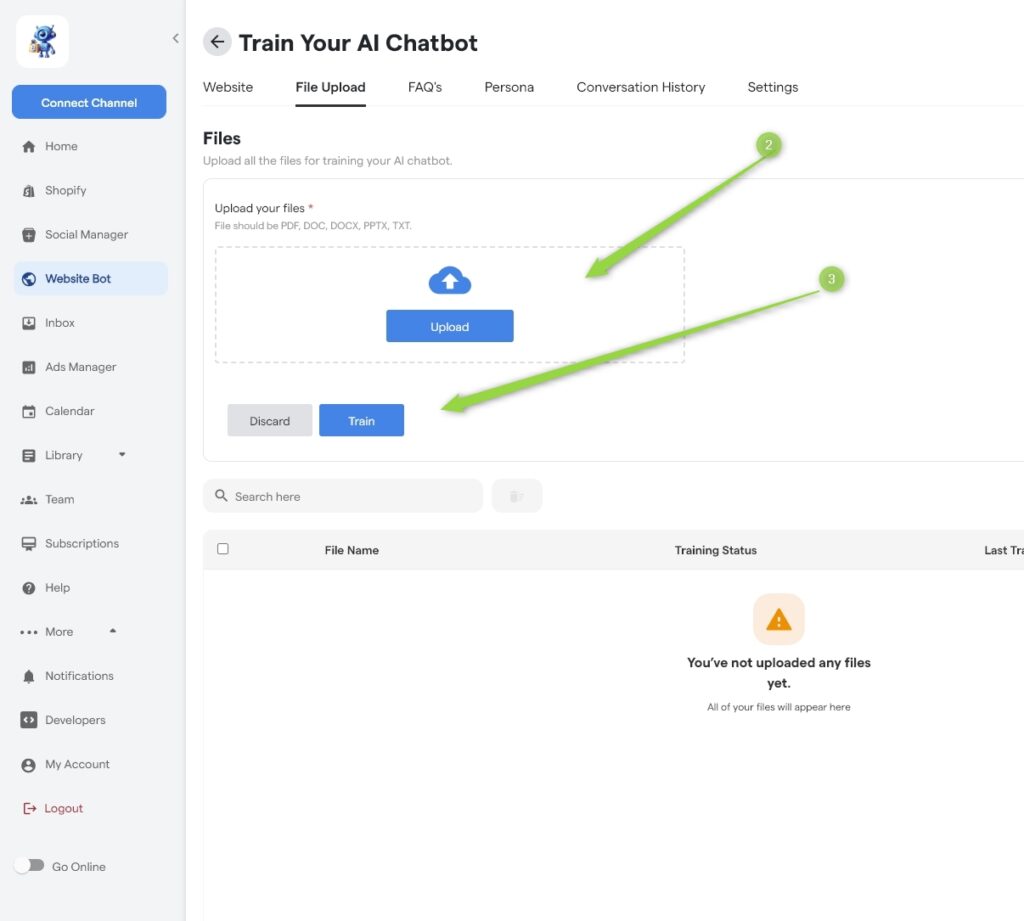
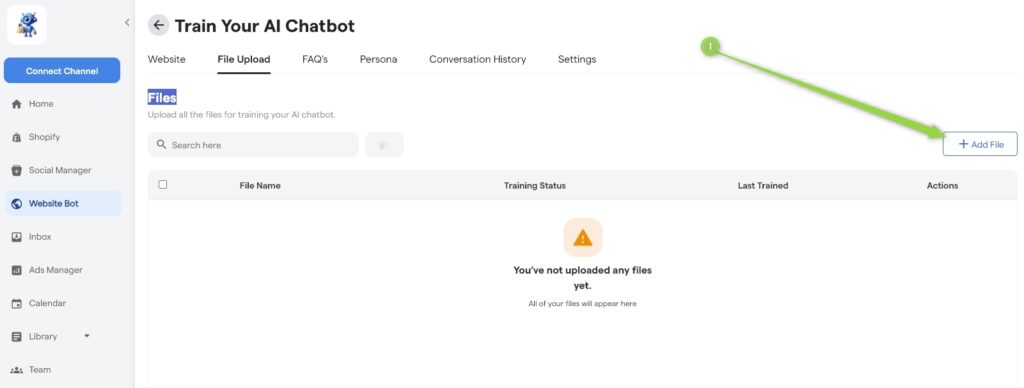
The process of uploading files is as follows:
- Click the “File Upload” section at the top
- Click “Add File” at the far right
- Drop or upload the files
- Hit the “Train” button to start the process
This should take little time, and your chatbot should be trained on files.
FAQs Training
You’ll see an FAQs section at the top menu next to the files upload section. That’s your first stop when training the chatbot on FAQs.
Once you click that button, you’ll see two options on the far right – “Add FAQs” and “Generate FAQs.”
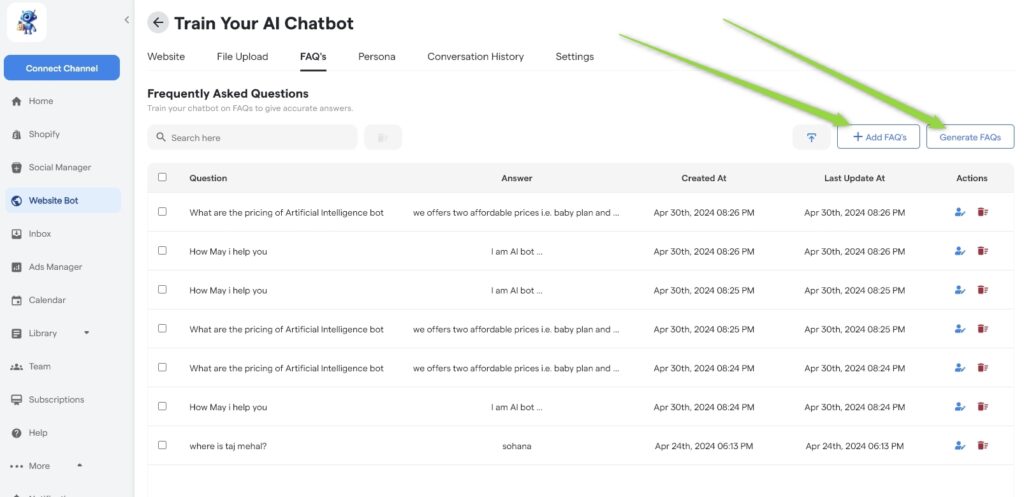
By hitting “Add FAQs,” you can add all the questions you think your target audience or customers would ask. This could be on any topic involving shipping, products, orders, etc. Check out some of these examples:
Question: How do I place my order?
Answer: Visit our website or contact our customer support team.
Question: Will I be able to track my order?
Answer: Absolutely, yes. You can track your order through a tracking code sent to you via mail or our website.
Question: What are the primary payment methods?
Answers: You can pay through PayPal, debit card, credit card, bank transfer, or Apple Pay.
Question: How long does shipping my order take?
Answer: You’ll receive your package within 3 to 5 days.
Ensure that you’ve formulated almost all the possible questions and their answers. That way, users can get most of the answers they seek before requesting a live agent.
You can generate your FAQs automatically by choosing the “Generate FAQs” option.
Here, the EcommerceBot chatbot asks you some questions, which helps guide it in formulating your FAQs.
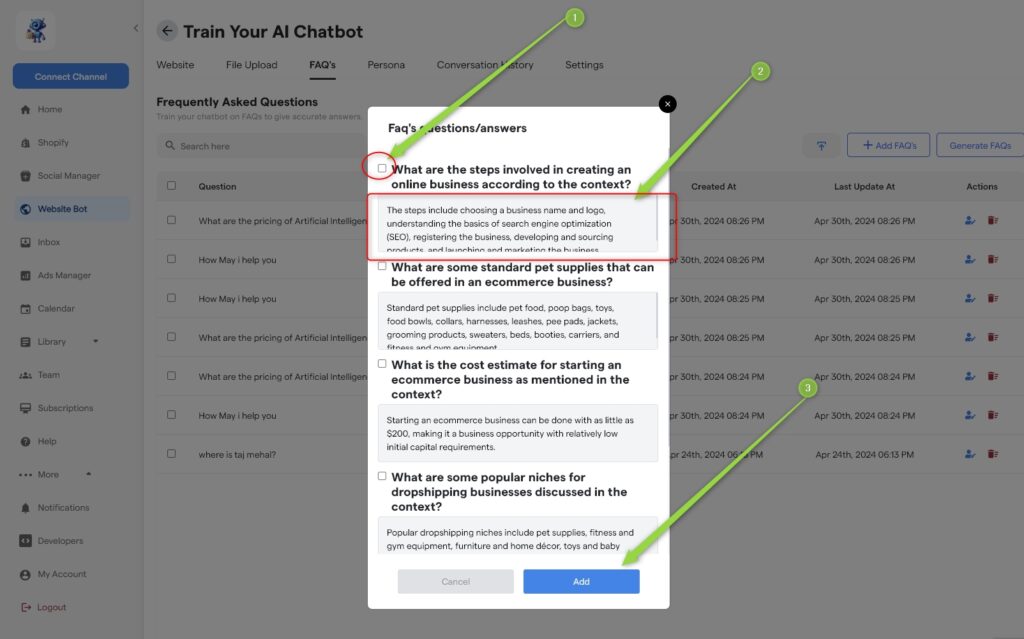
It will usually ask you ten questions from which you should choose and answer the relevant ones. Once done, tick the boxes and click add.
You can also edit or delete the FAQs if you wish.
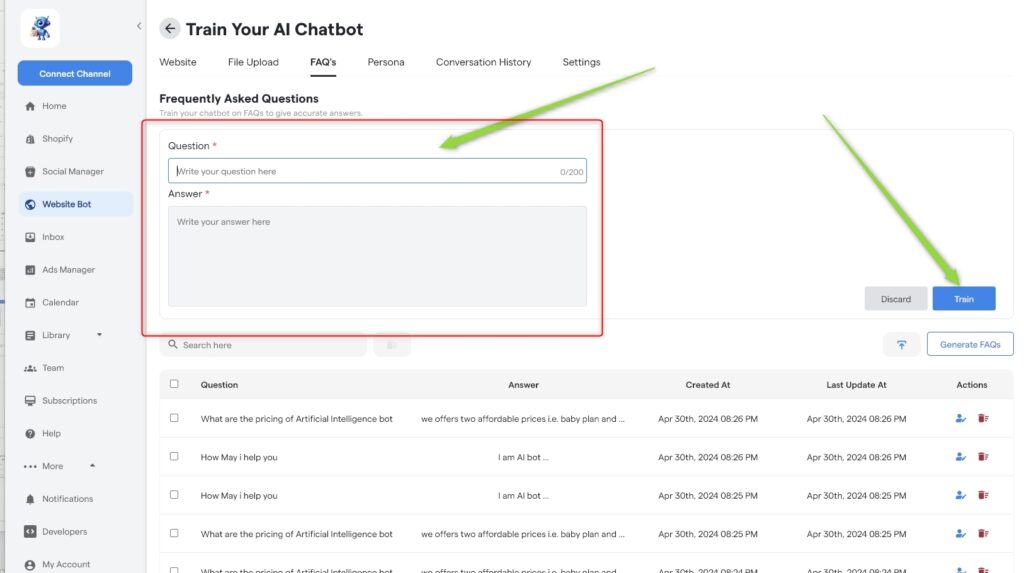
If you choose the “Add FAQs” option, ensure to enter the question and the answer in the boxes as provided.
Then, hit the train button. This should train your chatbot on the FAQs you’ve added.
On the other hand, if you go with the “Generate FAQs” option, ensure you tick the checkboxes beside the relevant questions.
If you are unsatisfied with the bot’s answers, you can always edit them. Lastly, click the add button at the bottom to train your chatbot on those FAQs.
Configure your Chatbot’s Personality
This is where you give your chatbot or live agent a personality based on your brand voice. You use the custom prompt to describe precisely how you want your chatbot to be.
For instance, do you want it to be friendly or formal?
Should it use emojis or not? Can it use slang? Answering these questions on the custom prompt box gives your chatbot the desired persona.
Still, choose the answer’s length and format based on the bot’s personality. Should it be short, medium, or long?
We recommend using short answers to make them easier to read and understand, especially on mobile devices. Also, should the bot provide answers in bullets or paragraphs?
The next step is to choose the tone. This could be formal, informal, joyous, etc. Remember to choose whether to use the first, second, or third person. For a live agent, this should be the first person.
Next, choose a language. There are numerous language options here, so pick your desired one. You can select multiple languages or even allow the chatbot to detect the user’s language and respond based on that.
Note: The training process is continuous. Keep training the bot to ensure it provides the best possible answers to your customers. Click the blue icon of a human with a pen whenever you want to edit the answers.
Train on Untrained Questions
Training the bot on untrained questions is easy. Go to the FAQs and assess the questions and answers. If there is one you’d like to change, click the blue pen icon beside it.
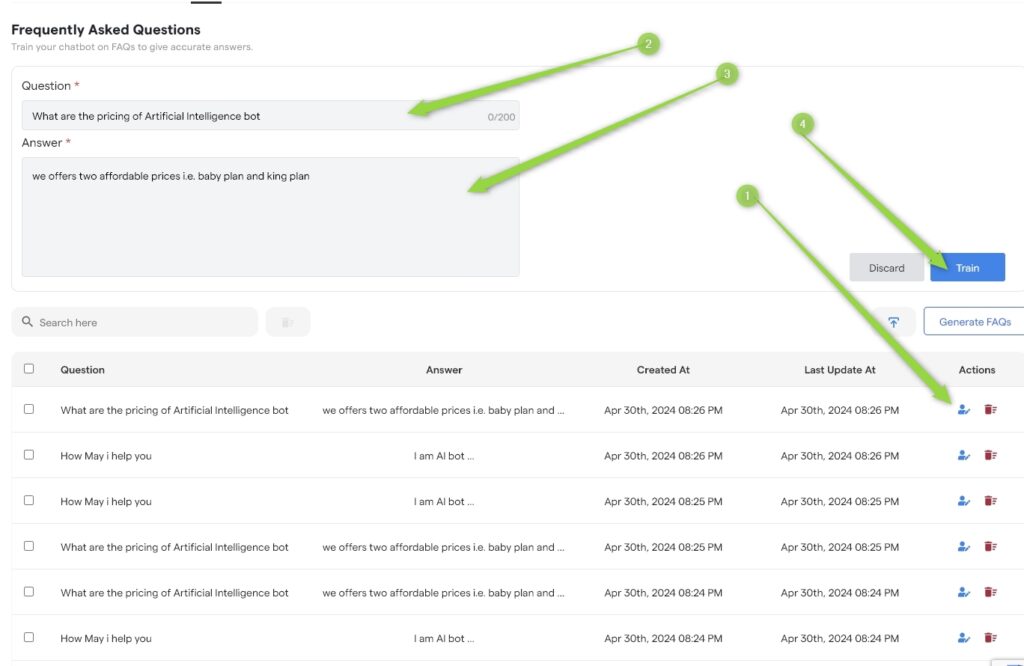
You can edit the question and the answer from here, then click train to train your bot on the new answer.
Setting Up Your Website Bot
When setting up your website bot, there are five main areas you must work on. They include the design, general, user access, chat window, and bot installation. And to help you understand better, let’s see how you should set up each section.
Design
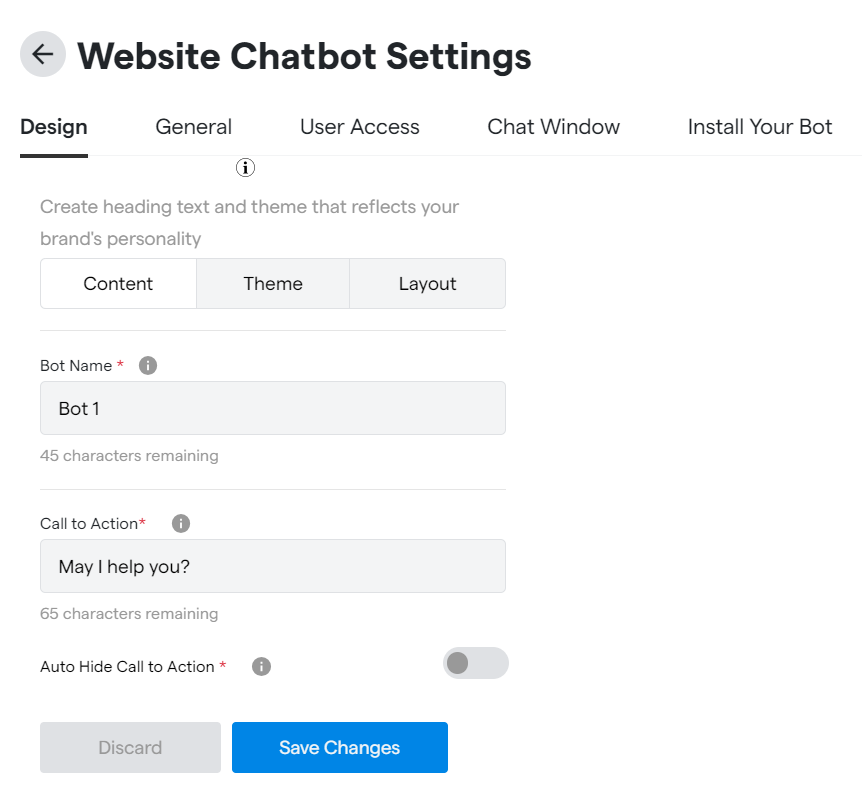
You determine how your chatbot looks under design. This section contains three subsections: content, theme, and layout.
Now, under content, there are three sections to set up. The first one is coming up with the bot name. That’s the name your users will use to identify your chatbot.
You’ll see the bot name box, where you can enter your preferred name. This could be any name related to your business.
You can use your business name followed by words like “super AI assistant,” “AI superhero,” etc.
After the bot name, fill in the “call to action” box. Here, you develop a phrase that the bot should ask the user. For example, “How can I assist you today?”
Lastly, you have an option to hide the call to action. After you’ve made your desired setting, click the “save changes” button.
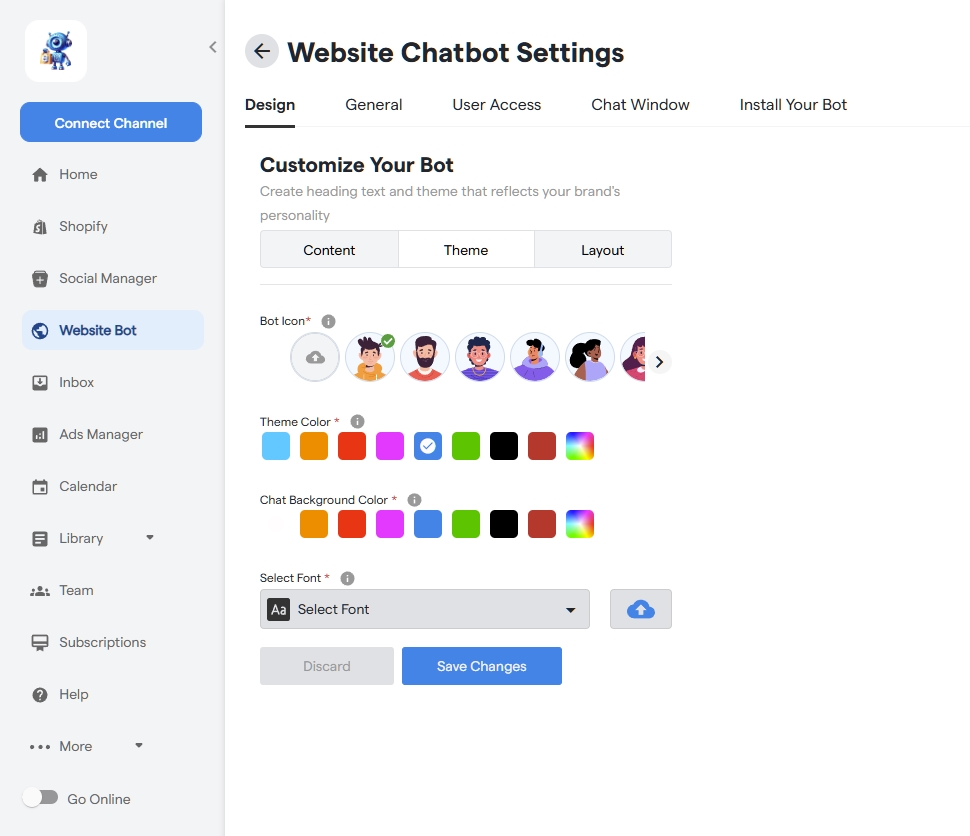
Next is the theme section. Here, you set up the bot’s image, theme color, and chat background color.
You can choose one from the provided list or upload your image for the bot image or icon. You can also select or upload fonts for the messages and then save changes.
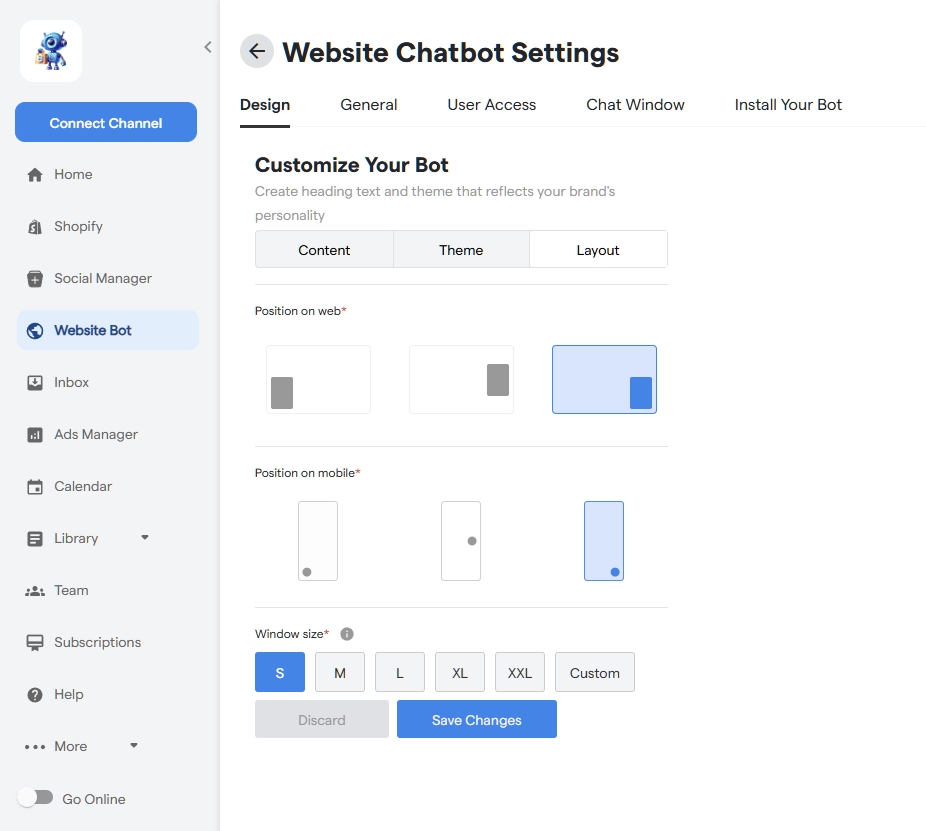
The last setting that affects the design is the layout. Here, you choose where to place the chatbot icon for web and mobile devices. You should also pick the size of the widget before saving the changes.
General
The General settings section also has several sub-sections to fill out. The first one is the “Waiting message.” This indicates the time a user has to wait before getting a response from a live agent.
It could be 2 to 3, 1 to 2, or 3 to 5. The shorter the time, the better for the user.
You can toggle the chatbot’s status from ON to OFF. You can also receive an email notification whenever the bot encounters a question it can’t answer.
Next, write an unavailability message, such as “The live agent is currently unavailable. Try again in a few minutes.” You’ll see the box where you can insert the message.
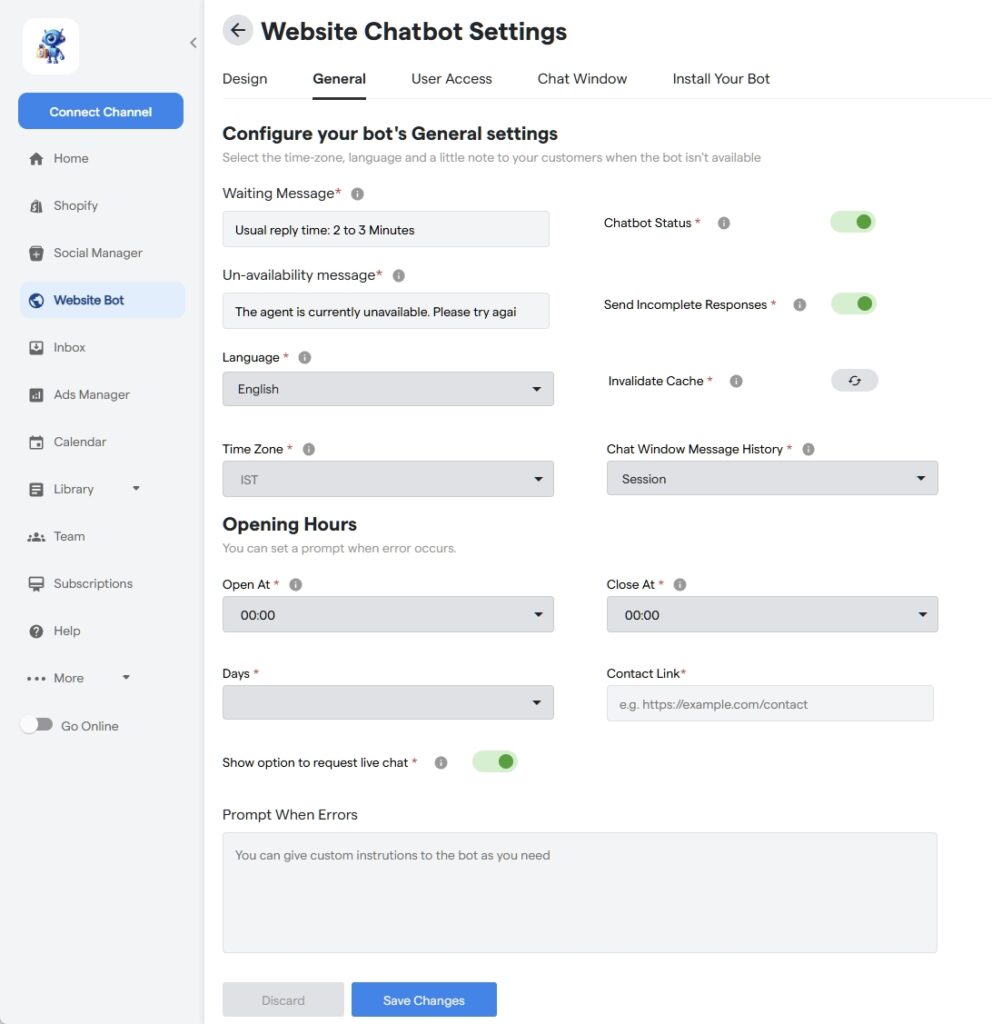
Once you have your message, go ahead and choose the language. Then, select a time zone.
The following important setting is choosing your open hours. The bot should know the exact hours your customer service is available for the chatbot and the live agent.
For this reason, fill in your opening time, the closing time, and the days the customer service is available.
Next, input your contact link, which is the link to your website’s contact page. For instance, “https://ecommercebot.com/contact-us. Once done, toggle the button below to show or hide the live agent option.
There is a prompt box at the end. You can give your chatbot any instructions you want to guide it when an error occurs, or the bot can’t answer a particular question.
For example, “Sorry, I currently can’t provide the information you seek. Can I direct you to our customer support team?”
The final nail is to save changes, and all is good.
User Access
Under the use access section, you can choose how your chatbot can be accessed. This section contains four parts that help you customize your chatbot’s user settings.
The first part is to select the type of devices your chatbot will be available. Usually, this should be set to “All devices.”
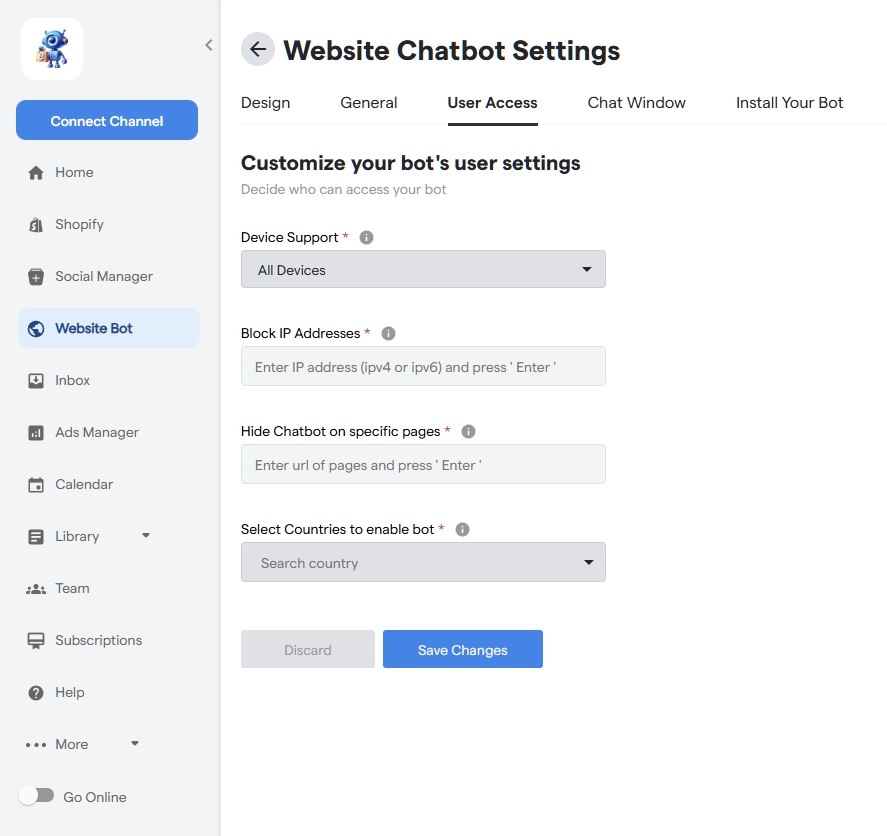
Next, indicate if there is any IP address you want to block. There is a box to insert the links.
The third section allows you to hide any pages on your website where you don’t want your chatbot to appear. This could be your product page, checkout page, pricing page, or any other page. Insert the URLs of those pages inside the “hide chatbot” box.
Lastly, choose the countries where your chatbot will be active. Then, click save changes for the modifications to take effect.
Chat Window
Next in line is to customize the chat window. Here, the first task is to choose whether or not to allow users to refresh the chat.
You do this by toggling the first button. When it turns green, you allow the user to refresh or restart the chat.
It would help if you also chose the name for transferring to live chat or a live agent. The default name is usually “Livechat,” but you can include your own, like “Talk to an agent” or any other name you prefer.
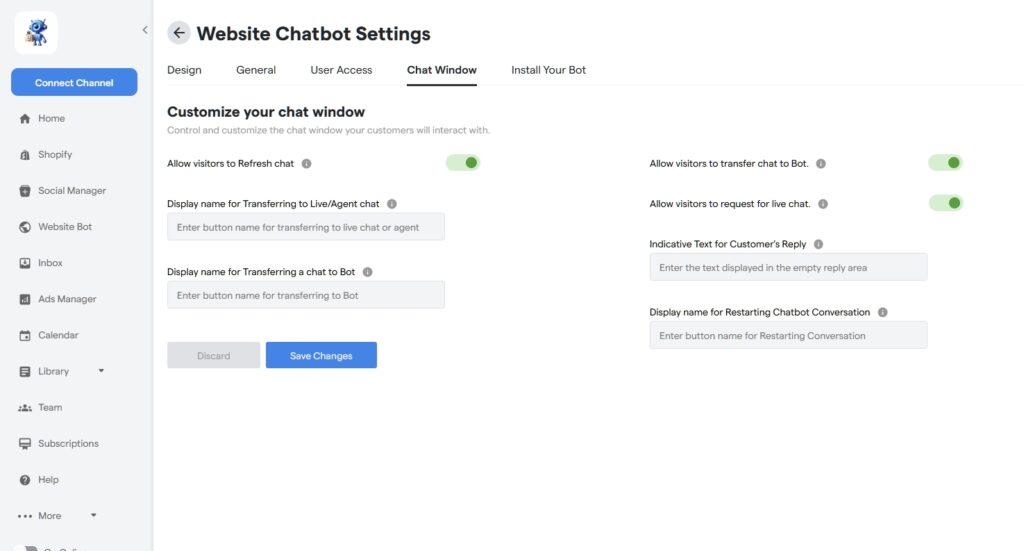
There is also a section for choosing the display name to transfer a live chat to the chatbot. For instance, you can select “Transfer to bot” or any other. Just make sure that it’s user-friendly.
Next, you have two more buttons to toggle. One allows users to transfer their chat to the bot, and the second will enable them to request a live chat.
When the buttons turn green, you’ve allowed them to take the action indicated there: to transfer a chat to a bot or request a live agent.
You can turn these buttons ON or OFF.
The following two boxes are pre-prompted by default, so you don’t need to worry about them.
These are the “Indicative text for customer’s reply box” and the “Display name for restarting conversation box.”
Your next step, therefore, is to click “save changes” to ensure that all your changes are saved and training is complete on that section.
Install Chatbot
After you have completed the first four steps, the last part is to install your chatbot. The process is easy: Follow a few steps.
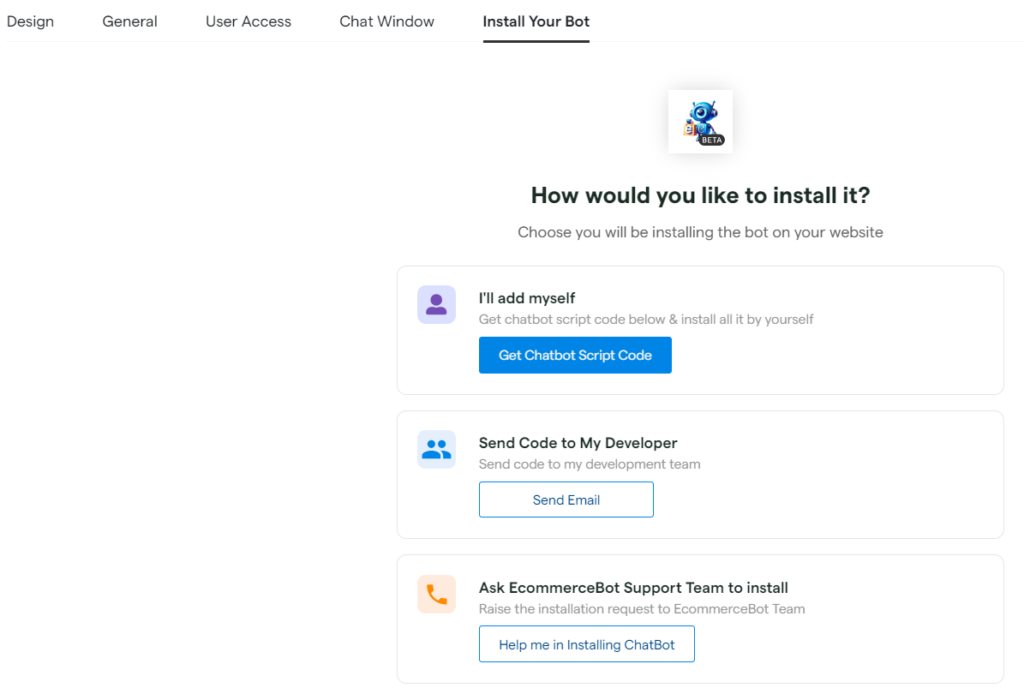
The first thing you see on the page is a question requiring you to decide how you would want to install your chatbot. Here, you’ll have three options to choose from as follows:
- I’ll add the chatbot myself
- Send the code to my developer
- Ask Ecommercebot Support team to install
Your choice determines the installation process.
If you pick the first option, where you do the installation on your own, you’ll follow the following steps:
- Copy the code snippet displayed
- Insert it in the HTML of the pages where you wish to display your chatbot
- Alternatively, you can paste the code in the footer before the tag closes to appear on each page
- Note: You can click “Quick Guide to Install” for a more detailed installation guideline.
- Then, to see how your chatbot looks on your website, enter your URL
- Finally, verify whether the process succeeded by clicking “Test Installation.”
The second option is sending the code to your developer. You must click “Send Email,” and the code will be sent. Your developer will do the rest to get the chatbot up and running.
The last option is to let our team assist. You click “Ask Ecommercebot Support team to install.” When you choose this option, our expert team will immediately spring into action to help.
Feature 4: Inbox
On the dashboard, there is an inbox feature. You can see and manage all your chats from all your channels.
The inbox gives you access to all the contacts you have acquired over time and allows you to start conversations from the contact list.
Direct messages are an integral part of any business. They provide personalization, privacy, and efficiency. In the inbox, you make professional collaborations, personal connections, and customer engagements.
The Inbox section contains three subsections: contacts, groups, and chats. You can customize each subsection the way you want.
So, how does each part work?
Read Also:
- Zendesk Alternative: Why Choose Ecommercebot
- Engati Alternative: Why Ecommercebot Tops The List
- How Do I Find A Supplier For My Dropshipping?
- 10 Best WordPress Chatbot Plugins For Your Website
- How To Create Instagram Posts With AI
Contacts
Here, you can add new contacts or export contacts.

Adding New Contacts
Easily add new contacts by following these steps:
First, go to “add contacts” by clicking on the blue icon of a passport-sized human with a plus sign in your top right corner.
Then, fill in the contact information you want to add.
You need to add the name, email, and phone number.
Finally, click the “add contacts” button. It’s that simple.
Exporting Contacts
Exporting your contacts from the platform is easy. All you need to do is tick the checkboxes (small empty boxes on your left) of all the contacts you want to export.
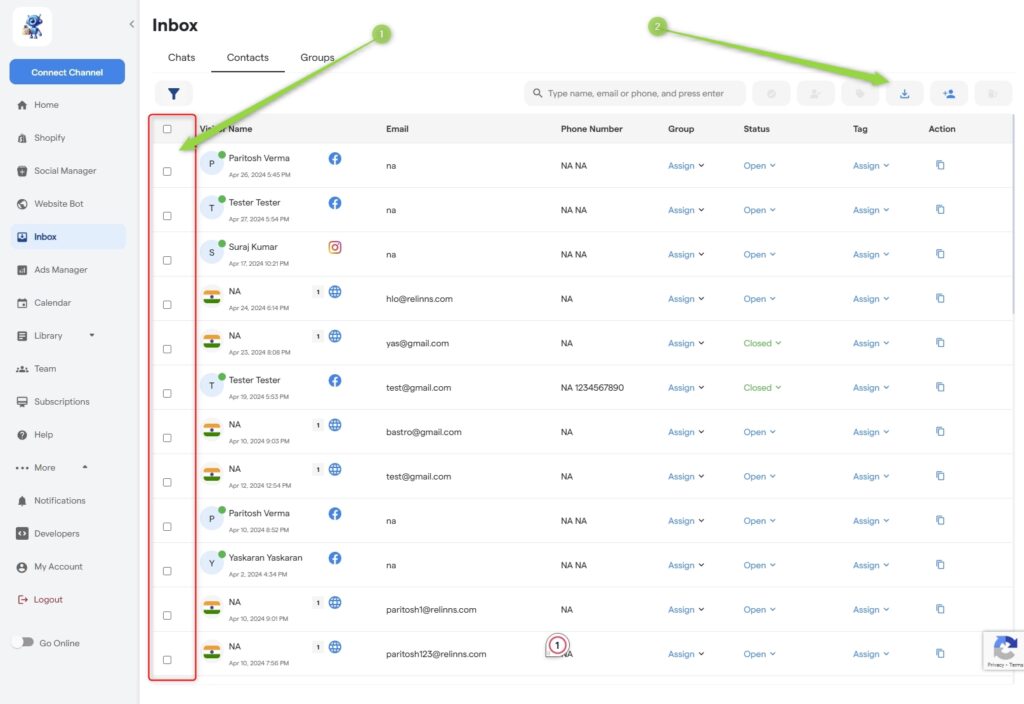
Then, click “export data” (the downward-pointing arrow at the top right corner). The data will download to your PC in Excel format, and you can upload it to any system, including your email marketing software, such as Aweber, GetResponse, or MailChimp.
Groups( Manage Group)
Organizing your contacts into groups can help you manage your marketing automation. It allows you to group your contacts from all your channels, including Facebook, Instagram, and TikTok.
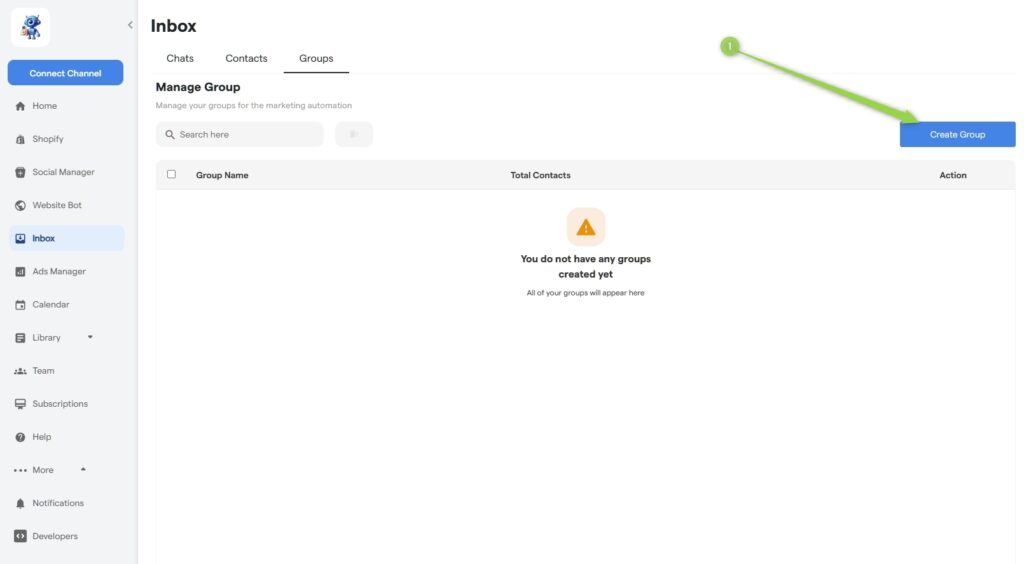
This way, you can communicate or send messages to multiple contacts simultaneously.
Here is how it works:
How to Create a Group
Creating a new group is straightforward. Just click the “Create Group” icon at the top right corner.
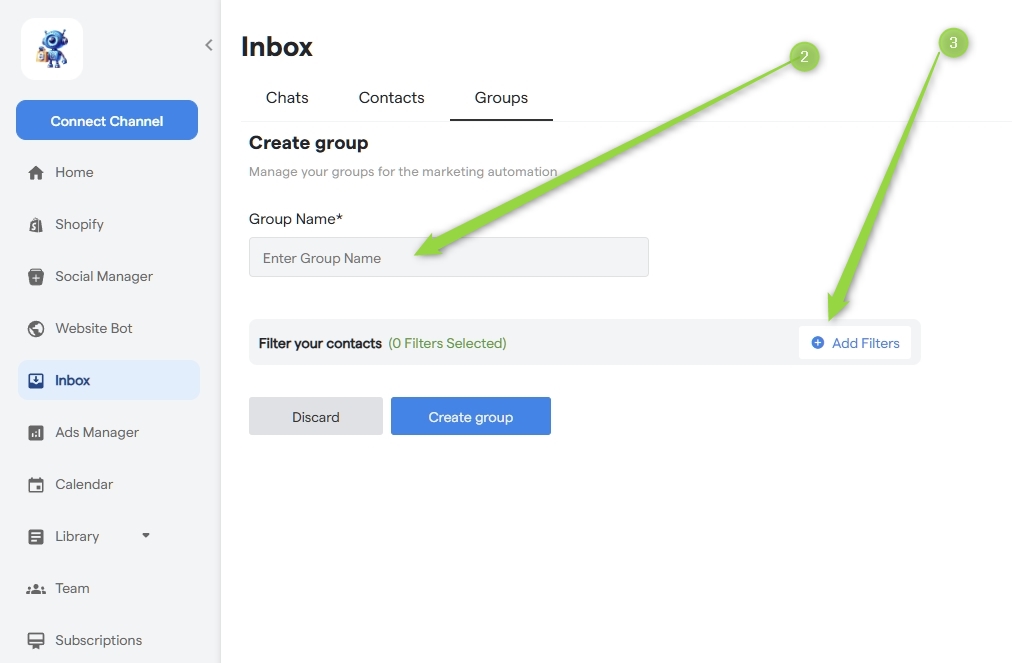
From here, enter the name of your group. The name can reflect the group’s aim or use any name you will easily remember.
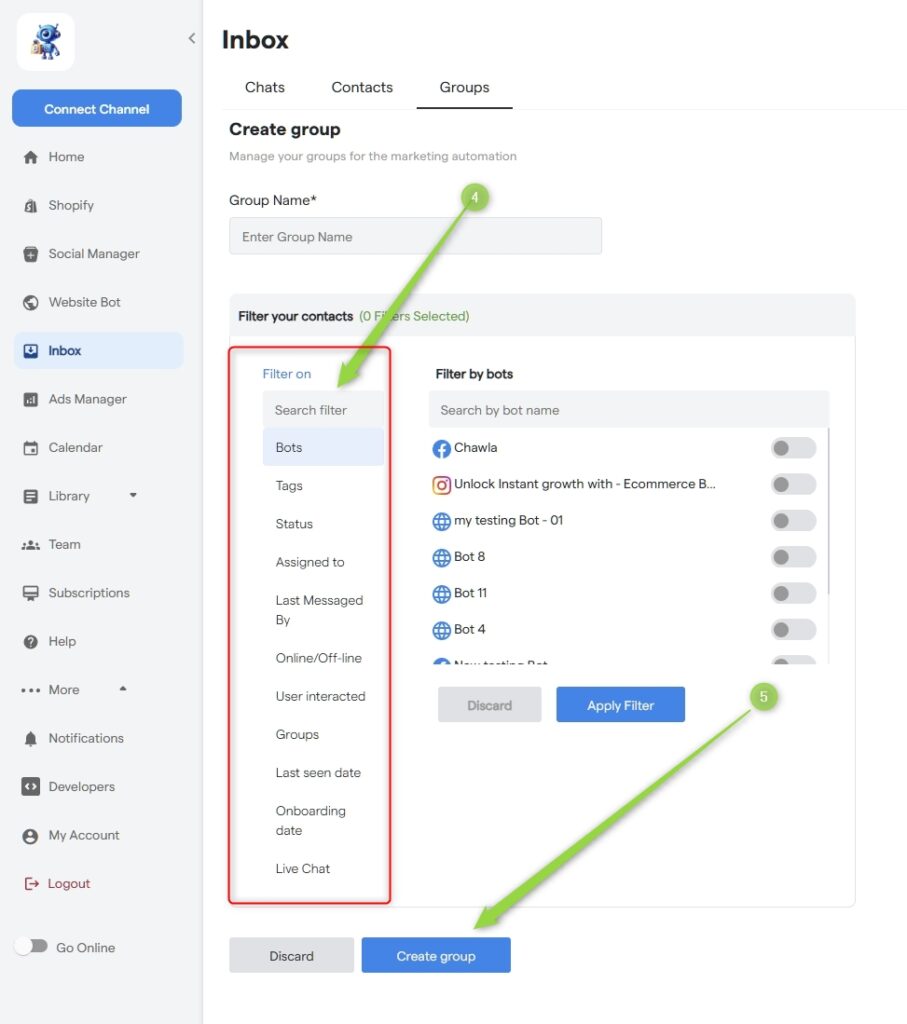
The next step is to click “Add Filters.” The filters are based on various parameters such as:
- Bots
- Tags
- Status
- Assigned to
- Last messaged by
- Online or offline, etc.
You will see all these options when you click “Add Filters.”
Complete the process by clicking the “Create Group” button. Your groups will be all set.
Chats
The chats section allows you to export your contacts into your email system. Start by clicking “Chats” from the main menu to do this.
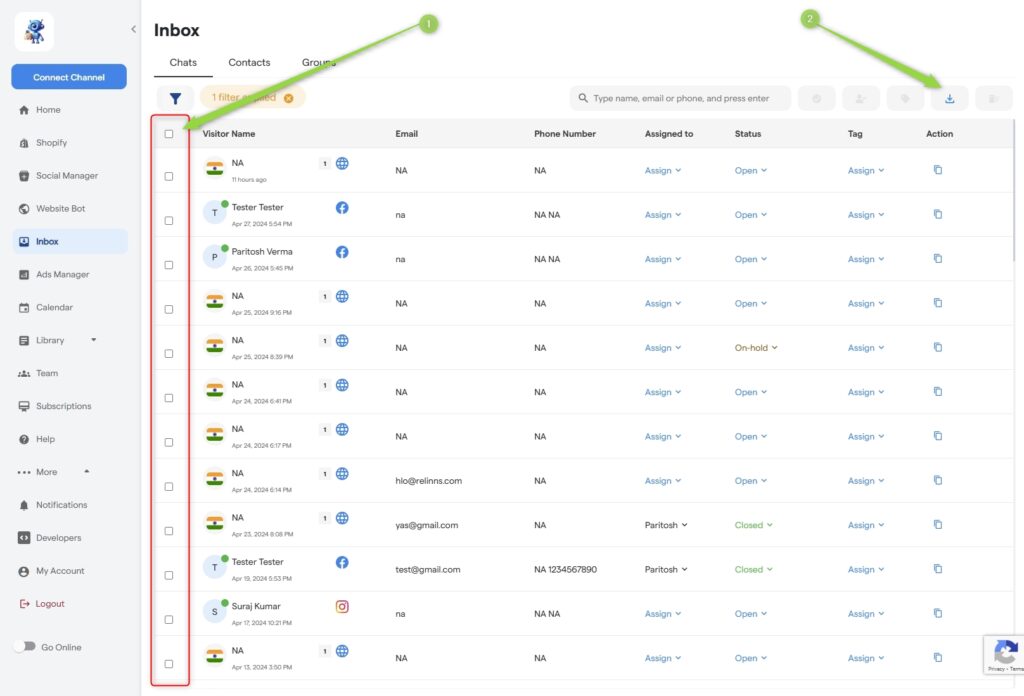
You will see a list of all your contacts, with a checkbox before each. Click to tick the checkbox of each contact you want to export. Once done, go to the top right-hand corner of the list/table. Look for the export sign (the downward-pointing arrow) and click.
Feature 5: Calendar
Setting up your calendar is also paramount. Using this feature, you can easily decide when to add products to your shop or when to post social media content.
In other words, the calendar helps you schedule your online shop’s activities.
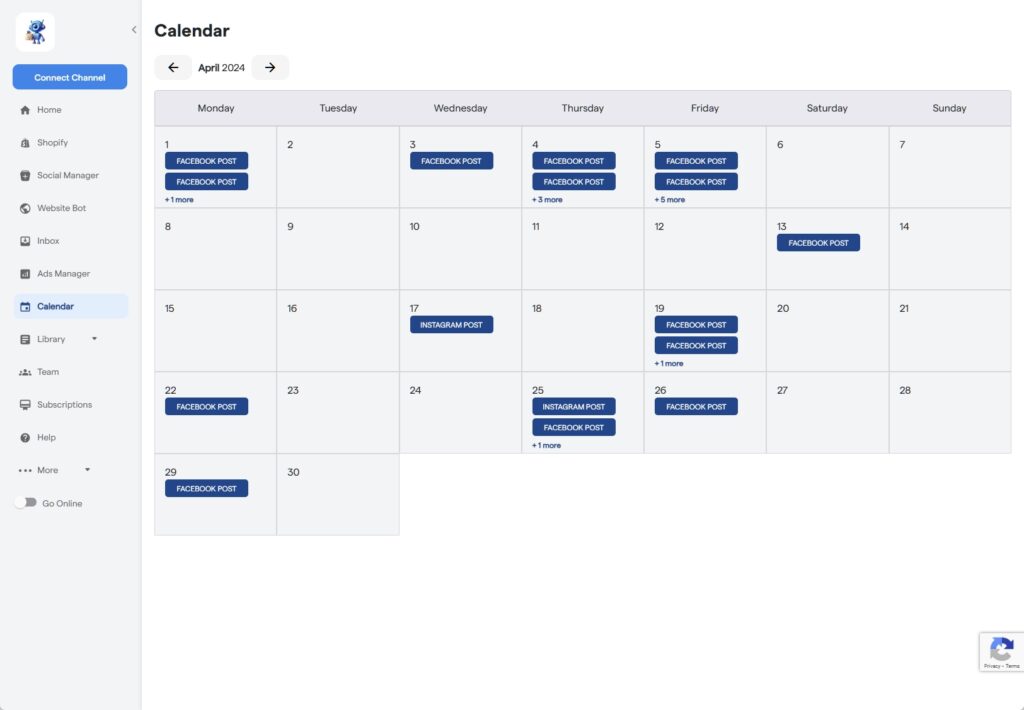
Whether you’re uploading new products, placing ads, or posting on your social media channels, the calendar lets you set the date and time.
A simple glance at your calendar lets you see everything you have planned for your business.
It keeps you updated on what will happen next, such as an upcoming marketing campaign’s start and end dates.
Feature 6: Library
The library is where all your shop’s social posts go. You can view all your social posts, including drafts and published ones. You can also access all the ad campaigns and see their success.
The library has two main sections – ad campaigns and social posts.
Ad Campaigns
This feature lets you view all your shop’s ad campaigns from a single point. This includes all your ad media and messages. A search bar is there for you if you want to search for a specific ad campaign without scrolling down the long list.
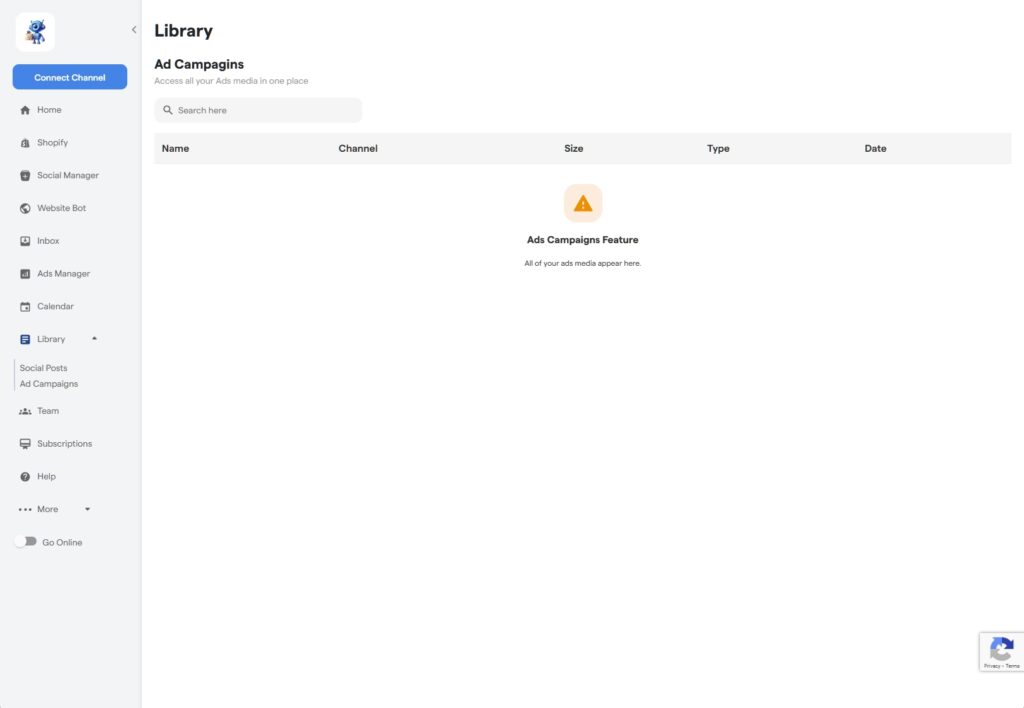
This section defines each ad campaign by name, channel posted, size, ad type, and posting date. Thus, you get the full description of each ad.
Social Posts
This section displays all your online store’s social posts. It gives you access to all the media from your social posts from a single central point.
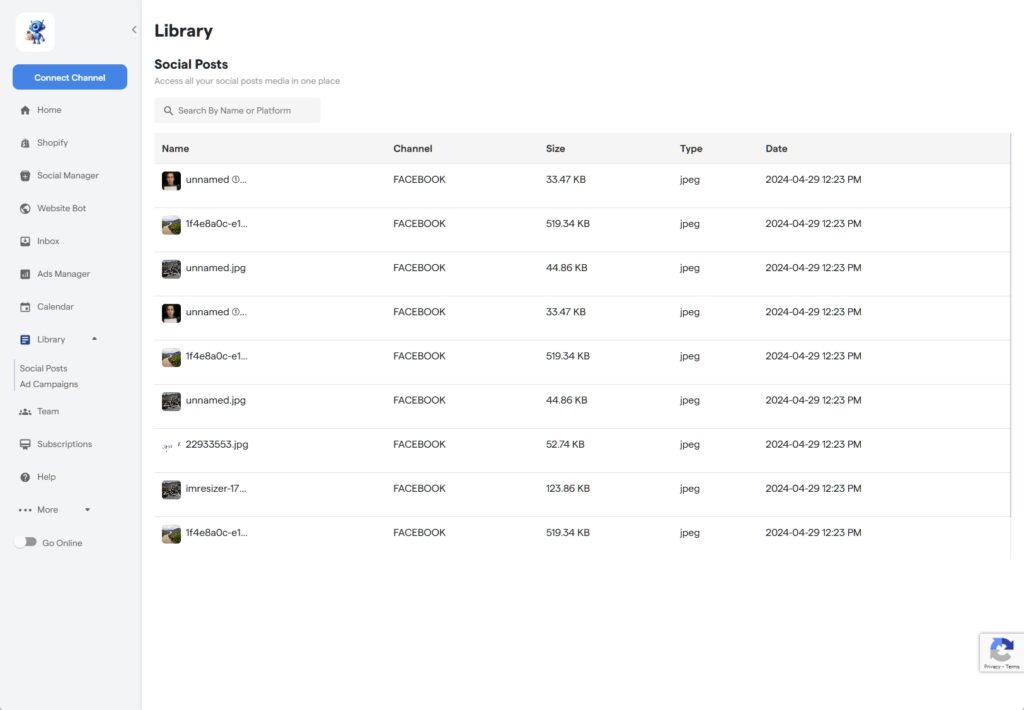
Like with the ad campaigns, your social posts will be described in terms of name, channel, post size, type, and date posted. Plus, there is a search bar at the top of this list to help you find specific social posts without scrolling through the numerous posts.
Feature 7: Teams
This is where you manage your teams. The section allows you to define which team members can access what and their specific roles. It is divided into two sections: users and roles.
Users
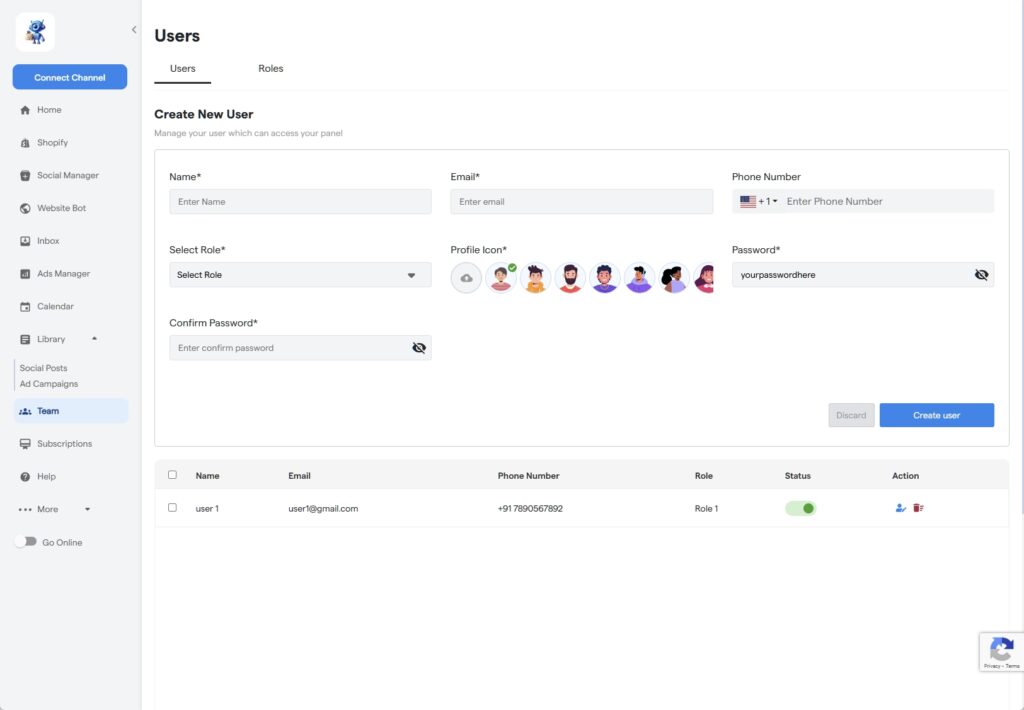
This section allows you to add and manage users. For you to create a new user, follow these steps:
- Enter name
- Enter Email
- Fill in the phone number
- Select role
- Choose a profile icon
- Enter password
- Confirm password
Complete the process by clicking the blue “Create User” button.
The user will appear below, indicating all their details. Toggle the status button to turn the user ON or OFF.
Note: You have the option of deleting or editing the details of the created user. See the “Action” section at the far right end of the contact details.
Roles
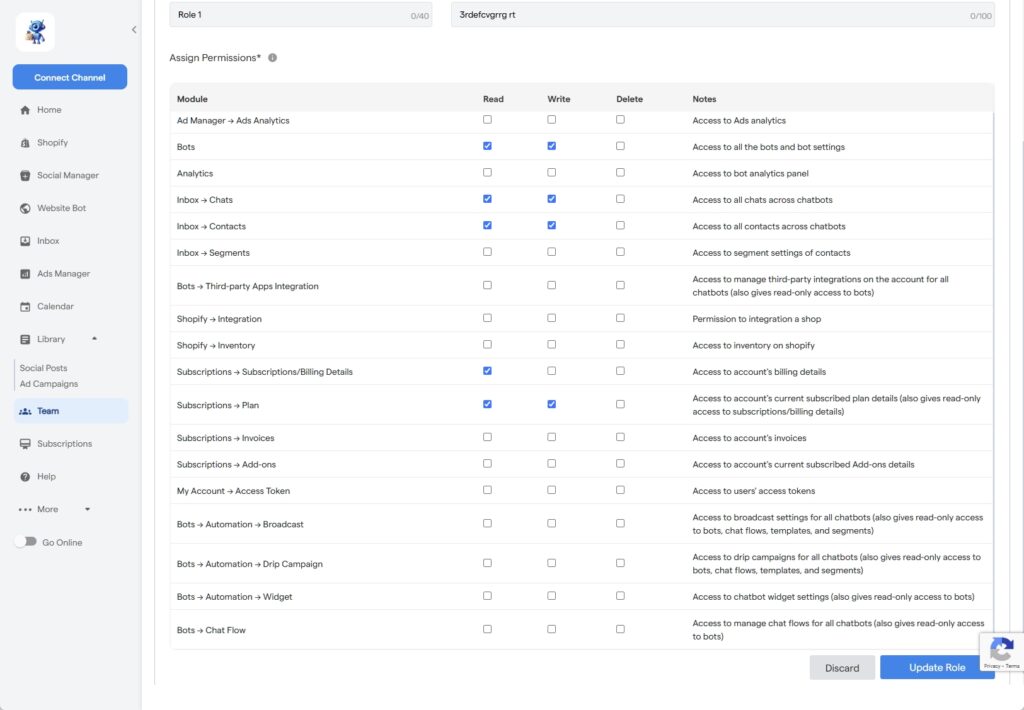
Here, you create and manage your roles. Once you make a role, you pick all the points that you want it to have access to. This is done by marking the checkboxes on the right hand of each point.
The role can access various points or modules such as Shopify integration, bots, analytics, inbox (contacts, chats, or segments), Shopify inventory, etc. You’ll see the whole list of points as listed.
Mark all the points you need, then click “Update Role” at the bottom. Your role will be created immediately.
Feature 8: More
This section comprises four sections as follows.
- Notifications
- Developers
- My Account
- Log Out
Let’s see what each of these sections entails.
Notifications
This is where you manage all your notifications. You’ll have access to all notifications listed by name and the message.
For example, a notification name could be “New Chat Request,” with a message like, “You have a new chat request.
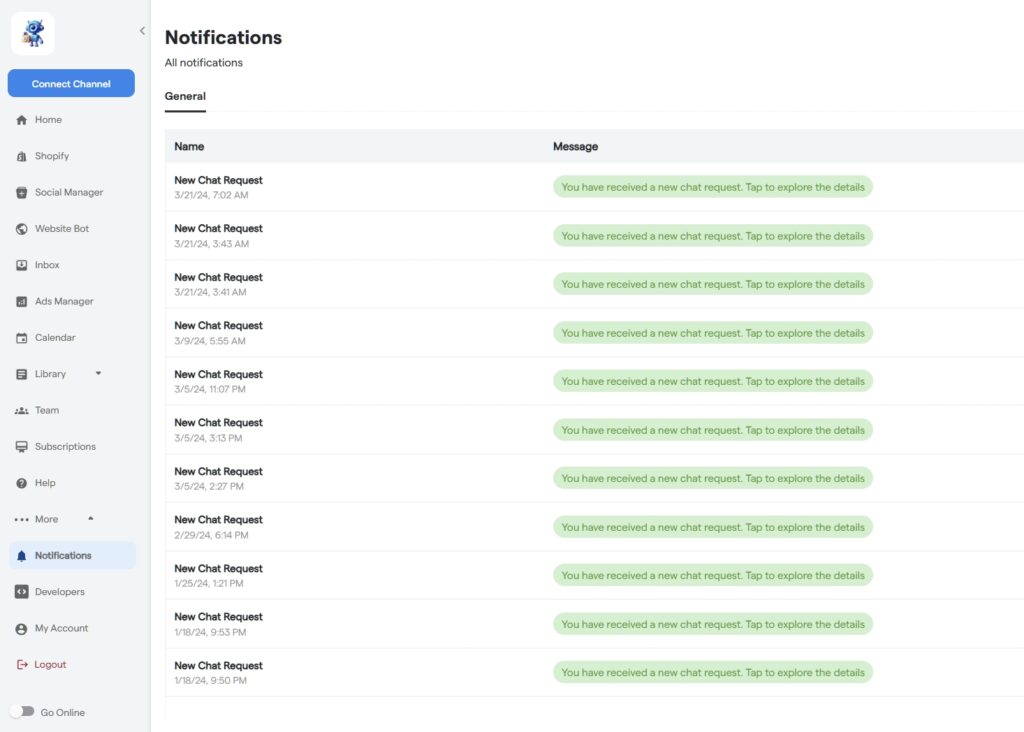
Click for more details.” Each notification will have a date and time of its sending.
So, to see who has contacted you, go to your app’s notification section to access every notification.
Developers
The developers’ section allows you to manage all your API integrations. Here, you give your developers the power to harness and exploit your dashboard’s full potential.
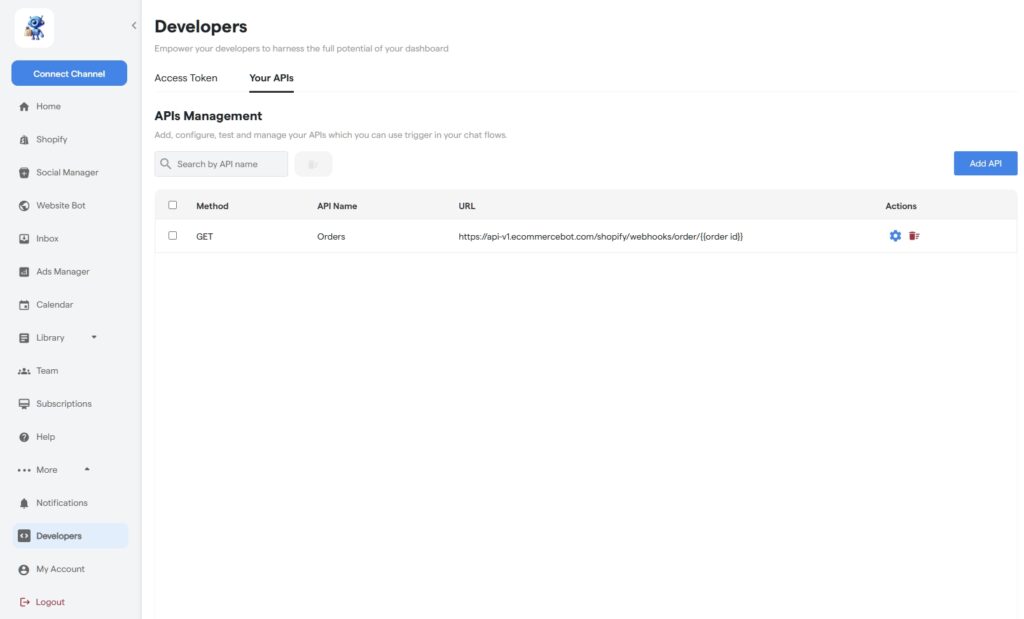
The developer’s section consists of Access Tokens and Your APIs. Access Tokens are the digital credentials you give a user or application after authentication. They allow access to specific resources for a limited time, meaning the user or application won’t require re-authentication during that period.
You can generate or revoke access tokens.
My Account
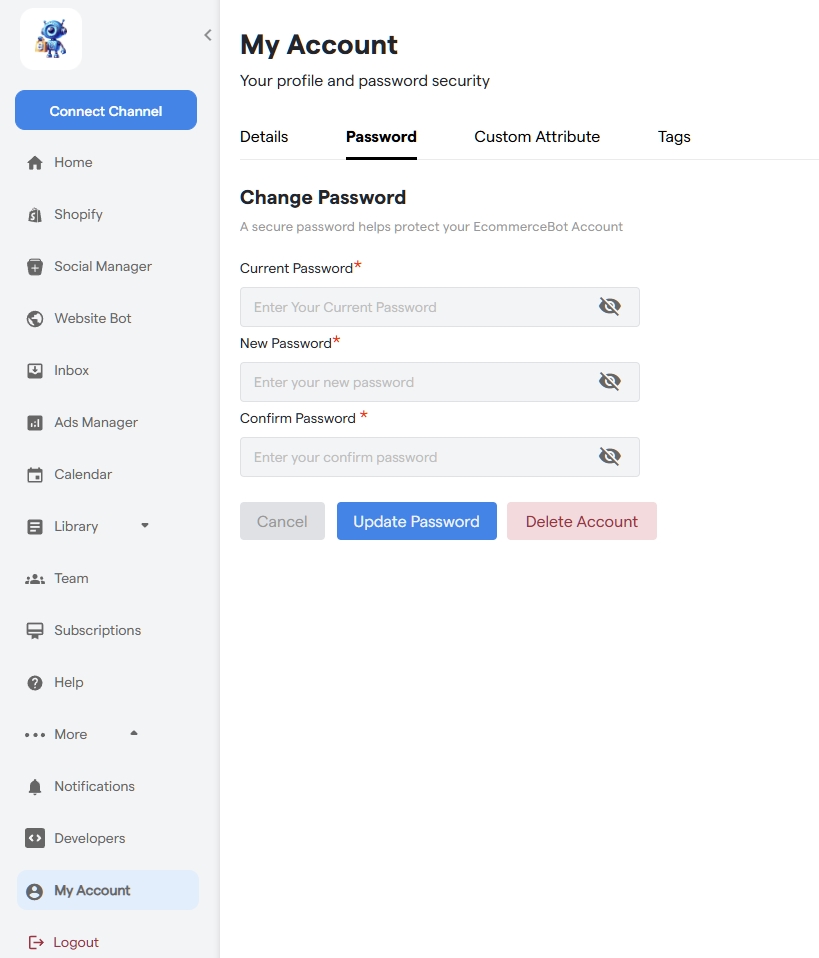
It’s time to create your account profile. The section allows you to add or change your logo, language, email, and passwords.
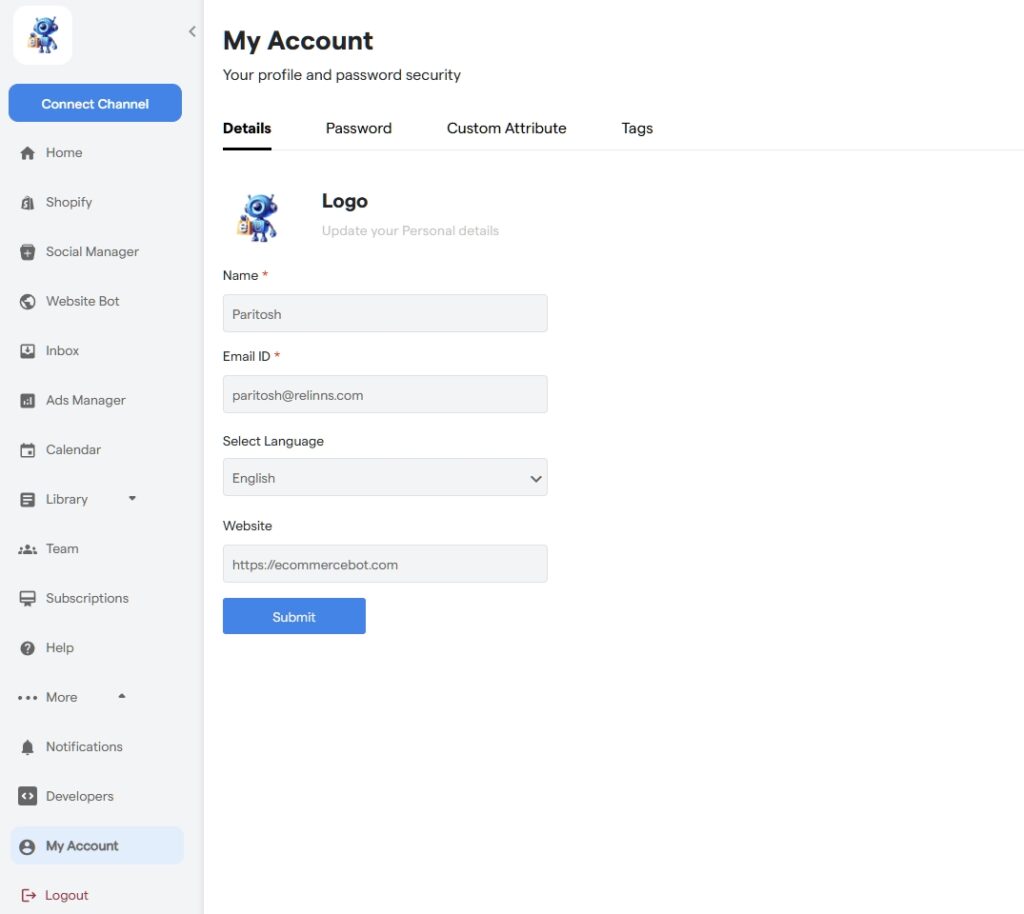
Start with your profile and password. To set up your profile, you’ll be required to input the following details:
- Logo
- Name
- Email address
- Language
- Website link
After you’ve filled in the details, hit submit.
To change your password, enter your current password and the new password. Re-enter the new password and click update password. It’s as simple as that!
This section also allows you to add or check your custom attributes. Click “Add attributes” and fill in the characteristics as prompted.
Lastly, you can manage your tags here. This allows you to use them better and organize your chats, leads, and groups. Click the “Create Tag” button to add a tag.
Logout
This is the last stage of how EcommerceBot works. You can log out when you want to stop or pause your app.
And it’s pretty simple.
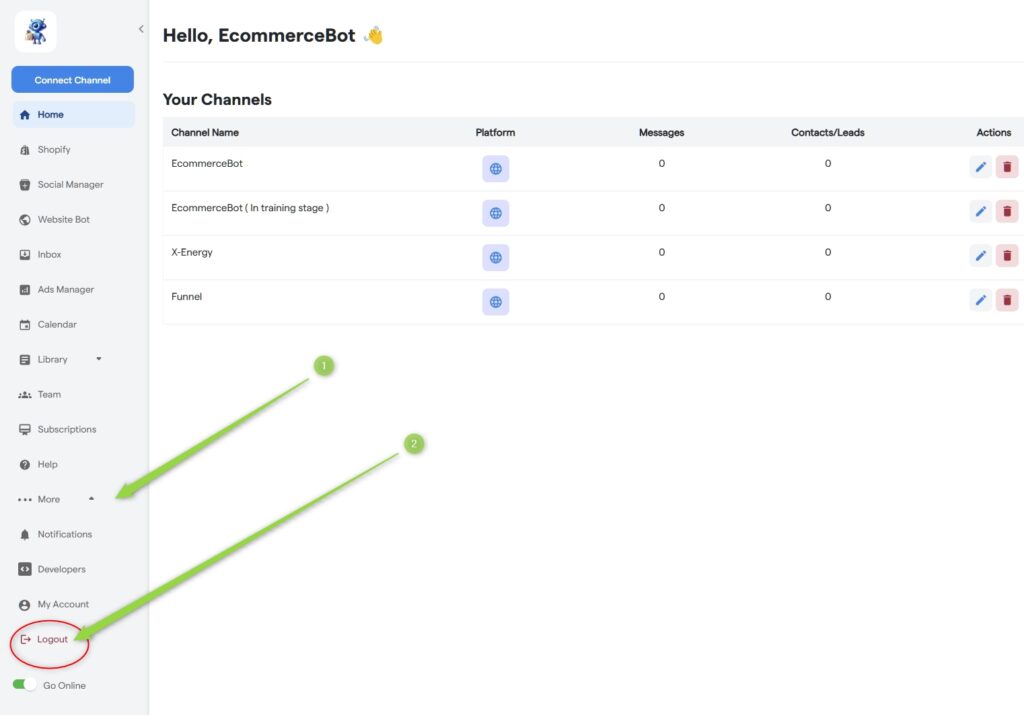
Just click “More” under your main menu, look for log out, and click.
Conclusion
The ecommerceBot is among the most comprehensive e-commerce AI automation tools available. So, if you want to run a successful e-commerce business, EcommerceBot could be your ever-reliable partner.
You can try Ecommercebot for free; no credit card is required. You agree to turn your E-commerce business into a success story by clicking the image below.

This guide lets you easily integrate the platform with your shop to guarantee the best results.
To sign up for EcommerceBot, visit our official store and click the “Get Started” button to Try It for Free.
